Saturday, May 30, 2009

Teacher Gifts

Here are some teacher gift ideas from The Creative Homemaker:

Here is one of the teacher gifts I did this year...

This one was really simple- Just type a quick saying like, "There's no 'Sub'stitute for a teacher like you" and print it on cardstock, 2 per page so it will fold into cards. Grab a gift card from your favorite sub shop and stick it on with mini glue dots. Write a nice note of appreciation inside to make it even more special, and throw it in a celliphane tied with ribbon. Walla! A gift any teacher would love and appreciate! (Got the idea from SkiptoMyLou.)

If your life is as crazy as mine and you missed "Teacher Appreciation Week", don't worry! You still have a week or two to throw something special together for an End-of-the-Year thank you gift. Here's what I did last year. I got the idea from EverythingPink, via TipJunkie.


Here are some other ideas via TipJunkie.

Ribbon Storage

I really need to organize my ribbon somehow. When I have my own house, I think this is a great idea by The Thrifty Chick:

So I made this ribbon storage" thingy" :) a couple of months ago, but my sister saw it and wanted to duplicate it, so I have been asked to put up pics of it! So here ya go! It was extremely easy. I am one of those lucky ones who have a "craft" room, and in my craft room I like to be able to SEE what I have, and I also like useing my stuff as part of my decor. I am all about bright colors, and especially organization. So I have a ton of ribbon that is used for all my hobbies (scrapbooking, sewing, decor, making bows for my girlies hair, etc.) and I wanted to be able to see what I had at all times. So I used some old wood from a past project, a piece of 1x4 wood, cut into 2- 2 foot pieces, and some leftover beadboard. The beadboard was cut into 2, 4 x 2 1/2 foot pieces. Then I just nailed them to each end to make the sides. I used my drill gun to drill the small holes on each side (which I did before I nailed them on) to put my dowels through, and voila! It was really simple, and even better"cheap" (all I had to buy were the dowels). If you want to duplicate it and need better instructions leave me a comment and I'll try to do a better job at explaining!

So I was looking at the sides of this and wondering why I didn't finesse my job by adding cute wooden knobs to the end. And then i realized why I didn't. If I had glued cute wooden knobs to the end I couldn't have pulled my dowel out when a spool of ribbon ran out and needed to be replaced! So that's why it just has the bare dowel ends poking out. Plus as you can see I hang yet more ribbon on them also!!

And this is how I store all my loose ribbon. In empty bottling jars!
So anyway, there ya go, my home-made ribbon storage thingy!!

Family Yahtzee

This is a very cute idea. Family Yahtzee by The Thrifty Chick:


With Summer coming up and kids home from school, I thought I would post this fun game I made for my family a few years ago. We have a family night at our house every Monday night. Games are always a BIG hit with the kids! I decided I wanted to try and duplicate some of our favorite games, but make my versions a little more personal. The first game was Yahtzee!! It is really easy to do, but I will admit is a little time consuming (there is a lot of waiting going on in the process of making this game). But in the end it is worth it!!
Supply List:
5- wooden blocks/cubes, (These can be in any size you prefer. When I first made this game 3 years ago I used 3 x 3 paper cubes. It was fun that they were so big, but awkward to store the game) The cubes I used for this tutorial are 1 1/2" x 1 1/2" wooden cubes. I just purchased a 10 foot piece of 2 x 2 wood for $2.50 at Lowes and cut the amount of cubes I needed. (I don't know why wood is measured this way, they say the wood is 2 x 2 but the actual size is 1 1/2 x 1 1/2??) I did find these wooden cubes for a farely decent price on oriental trading If you want to buy some ready made.
Acrylic paint for the actual color of cubes you want (mine are painted in white)
1- 12 x 12 sheet of scrapbook paper in whatever pattern you choose
Mod Podge
3 sponge brushes
A container to store your finished dice/cubes in ( I just bought a small chipboard box with a lid from Michaels Craft store)
6 different pictures cut in squares
The first thing you'll want to do, regardless of where you get your wood is lightly sand all the edges so they are smooth, and then paint each entire cube with 2 layers of whatever color paint you choose. (Oh and I didn't have my box in this picture, but if you are going to store your game in a chipboard box you'll want to paint it also with 2 layers of paint at the same time)

You'll want to let them dry at least 45min to an hour, or until you know for sure they are totally dry. In the meantime you'll want to cut your patterned paper into the right size pieces to place as a background on each side of the cube. You will have 6 sides to each cube, and 5 cubes. So you will need 30 small squares of paper. How big you want them, is based upon how big your cubes are. (I cut my patterned paper into 1 1/4" x 1 1/4" pieces, so there was a quarter inch wooden boarder around each piece of paper.)

Next you'll want to spread 1 layer of mod podge onto one side of the wooden block and place a square of patterned paper over it. Making sure you rub all over on the paper pushing out any bubbles underneath it and sealing down the edges and corners. There was no rhyme or reason to what angle my patterned paper faced, it's just whatever floats your boat!! Once you have placed the paper on, you'll then want to paint a second layer of mod podge over the patterned paper, completely sealing it on. This is where the waiting begins. You'll want to do the mod podged pattern paper on all sides of the cubes. But you'll want to wait at least 5 - 10 minutes to let each side dry before placing it face down to do another side.
If you want to add a matching patterned paper game title to your box like I did, this is when you'll do the same process as the cubes. By painting one mod podge layer, then sticking your patterned paper over it, and then painting a final mod podge layer over your patterned paper.

All of the patterned paper mod podged to the cubes and now drying...

While waiting for my cubes to dry, I spent about 25 minutes picking out what pictures I wanted to use on the cubes and printing them. You will need 6 different pictures, and then each picture duplicated 5 times. I just used my Photoshop to line up my pictures and print them all on 1 page. (My pictures were 1 inch x 1 inch squared. You can cut your pics out any size you wish for your cubes. I wanted mine to be about 1/2" less than my wood size)

While editing and cropping my photos down to size, I used my round paintbrush in photoshop to add a white dot to the corner of each pic. I then assigned a number to each pic, representing the number the pic would be on the dice(cube).

Once all the mod podged dice were totally dry...

I then added my pictures to the blocks the same way I added the patterned paper. With a layer of mod podge, then the pic smoothed down, and a sealing layer of mod podge over the pic.

Again, you'll want to let the mod podge dry for about 5-10 minutes between layers and pics. After it's all mod podged you'll want to leave it drying on a cooling rack over night. And that's it! By the next day it should be totally dry and ready to play with!!

These are some pics of my original game I made a few years ago. I made them with cardstock cubes, so they didn't hold up as well, and they were really big so they had to be stored in one of these big plastic containers.

We only had 4 family members at the time and 1 family pic, so I just used the word Family as the last side of my dice.


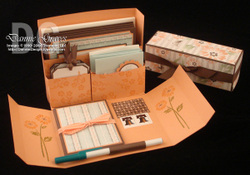
I printed up my own game cards to store with my game. These are totally identical to the actual games cards that come with the game of yahtzee, just in a cuter font to go with my home-made game.


A close-up pic of the final storage box the game goes into..

A close-up pic of the final dice/cubes...

Obviously you don't even have to make this a family yahtzee game. You can personalize it with any theme!! It would make a great gift to a family member who loves games!! Whatever you decide to do, hopefully you will have as many fun hours enjoying your game as we have!!

P.S. So I was thinking that giveaways on blogs are just too stinken fun to not do them on a regular basis. I was thinking of my next giveaway to actually be one of these personalized Yahtzee games. Where the winner just emails me there 6 pics they want on the cubes and I make them a game? Is it cheezy? Or if I did this as a giveaway in a few days you would totally be interested??

Sunday, May 24, 2009

Crafty Garden Markers

I should make these w/ my kids. From Make and Takes:

We’ve just planted our summer garden and needed a few markers to label our vegetables. So we made these fun and easy foam garden markers that will make it through any rainy days and help us remember what we planted. And they also add a touch of whimsy.

Craft Garden Marker

Supplies for Garden Markers:

  • craft foam sheets
  • craft popsicle sticks
  • hot glue (for an adult)
  • scissors (kid friendly)
  • permanent markers

Garden Marker Supplies

On the craft foam sheets, have your child draw the shape of the vegetable, try to use the same color of foam as the real veggie. Then have them cut it out around the drawn veggie, or you can cut it out for them. Also write the name of the veggie onto the front of the cut out shape. It’s good to write the words, giving them more exposure to reading.

Draw Garden Sticks

For the adult, hot glue the foam veggie onto a craft popsicle stick and let them dry. Now they’re ready for the garden.

Vegetable Garden Markers

We also made some garden markers for my herb garden. But we used white foam squares and drew the picture onto that instead of in a shape.

Herb Garden Markers

These are going to help us remember what we’ve got growing in our garden, we’re just awaiting the spoils.

Chicken in a Pan w/ a Tan

Yummy looking recipe from Little Birdie Secrets:

Emily from Freshly Baked by Georgie Tees is here today as my guest sharing a favorite recipe Chicken Divan… aka Chicken in a Pan with a Tan!

One of my favorite dishes growing up was my mom’s Chicken Divan, aka Chicken in a Pan with a Tan. This creamy, cheesy, broccoli-filled casserole has since become a family favorite in our home. Where did we get “Chicken in a Pan with a Tan?” Let’s just say one dinnertime rhyming game got a bit out of hand…trust me, the name was a lot longer than that!

Chicken Casserole

Besides being a great way to teach rhyme, here are the other reasons why I love this dish:

  • It’s easy and I always have all the ingredients on hand
  • We always have leftovers my husband can take to work the next day
  • I have yet to hear of a child who doesn’t like it.
  • It makes a great dish for taking to a neighbor or family member in need.
  • The recipe doubles (and even triples) really well.
  • Cream and cheesy…need I say more?

But one of the main reasons why I love Chicken Divan is its sentimental value. I made this dish for my good friend when she was on bed rest pregnant with twins. I can still remember leaving it in the kitchen with a batch of homemade rolls, explaining to her husband that I’d added a bit of curry to the recipe and I hoped that was okay. The second time I made Chicken Divan for her was two years ago after she moved across the country. While visiting her I made it for her family along with a batch of my famous homemade rolls. It was like déjà vu only much tastier!

Since then she has made this recipe for her family multiple times as it is now a family favorite in her home as well. I am visiting her again next week and I’m sure we’ll be whipping up another batch of Chicken Divan—it’s tradition! Here’s the recipe with a few of my own notes and suggestions thrown in for good measure. Enjoy!

Recipe for Chicken Divan:

  • 1/2 cup mayonnaise
  • 1 can cream of mushroom or cream of chicken soup
  • 1/4 to 1/2 cup milk (enough to make it creamy but not soupy)
  • 2 cups cooked, cubed chicken
  • 1-1/2 to 2 cups shredded cheddar cheese
  • 1/8 to 1/4 tsp curry powder or to taste
  • 1/4 teaspoon pepper
  • 1 package frozen broccoli (florets or chopped, your choice)
  • Cooked white or brown rice (I use about 4 cups)

ingredients

Preheat oven to 350 degrees. Grease a 9×13-inch pan or similar casserole dish. Mix mayonnaise, soup, milk, chicken, cheese, curry powder and pepper. Cook broccoli according to package directions. You can either layer the rice in the pan or leave separate; I prefer to layer. In greased pan layer rice (I use about 4 cups), then broccoli, then chicken mixture. Bake for about 35 to 40 minutes or until heated through and bubbly on top.

layers

Post script:
For a family of six I suggest doubling the creamy mixture (mayo, milk, soup, cheese and curry powder) and using three chicken breasts. I prefer cream of chicken but if doubling I’ll often throw in a can of cream of mushroom so the cream of mushroom doesn’t get its feelings hurt. If you don’t like curry powder, leave it out. Instead try topping the casserole with grated Parmesan cheese! I use brown rice because you can hardly taste the difference and it’s healthier than white rice.

Make it even healthier by using low-fat or low-sodium soup and low-fat mayo. To make life super easy I buy the steam-in-the-bag broccoli florets. If it’s a smaller bag I use two for our family. They’re not as cost effective as my huge Costco-size bag of broccoli, which I also have in my freezer, but it saves on dishes and often saves my sanity.

Pampered Chef Micro Cooker

For cooking chicken I love, love, LOVE my Pampered Chef Micro-Cooker pictured above. Just throw in 2-3 frozen chicken breasts (depending on size), cover with water and microwave on high for 20-25 minutes. Voila! No boiled chicken smell throughout the house!

Chicken Divan tastes best served with a side salad and homemade rolls. Perhaps I’ll have to do another guest post on Make and Takes and share that top-secret recipe with you!

Chicken Divan

Thanks, Emily. Oh my my, does it look good. Who can say no to all that creamy goodness. I can’t wait to make it! I love to know about those secret family recipes! You can see more of Emily at her blog Freshly Baked.

Stationery Box

Very cute Stationery box from Little Birdie Secrets:

I found the cutest stationery box made by one of our readers and stuck it in my "to-do file" for later. Wouldn't this make a perfect Mother's Day gift? While looking for a pattern that I could link you all to, I found another blogger that actually has an awesome video tutorial showing step-by-step how to make this darling box. It's got pockets to fill with handmade cards, gift cards, and tags, as well as stamps and an address book. My favorite part is how they all coordinate!

Thanks to Stampin' Up! demonstrator Dannie Graves for letting us share her pictures and link to her video with you! She makes the whole project really simple. Isn't this a beautiful set?


Reader Tiffany Cordero, winner of our card swap contest and also a Stampin' Up! demonstrator, made these sets--LOVE the color combos!

You've still got 10 days until Mother's Day (or should I say only 10 days?). Either way, you have time to make this box and a bunch of cards. Your mom is going to love it. {You're welcome.}

Puppy Party

Tara would like to have a Bolt birthday party. In case she keeps w/ that idea, I thought I should keep these ideas. Some would work well for a Bolt party. More from Design Dazzle:

Puppy Party
A puppy party theme is a perfect party for a combined boy/girl party. Depending on the ages of your child depends a lot on if they want to invite the opposite sex to their birthday party. What I found is in their early years they want all their friends invited. Late elementary school years they decide they don't want the opposite sex at their birthday party; then in the middle school/high school years they decide they want them back again:) Of course, every child is different:) This is a great theme for a first birthday "paw"ty.
Check into hiring an agency that will bring puppies to your party (kind of like a petting zoo but with puppies). Most children adore puppies – you'll be sure to hear lots of oohhs and aahhs!

Puppy Party Table Decor: I purchased stainless dog bowls from the dollar store - great for serving ice cream and cake! Dog bone cups are a must for a puppy party; when will you ever get to use bone cups at a party?

Dog Invitations are very important - they set the mood for a party! We all know that first impressions can make or break you - the same goes with an invitation. It's the first thing someone sees when invited to a party, so it's important to make the invitations as nice as possible. I made this invitation at home with striped card stock and a computer. Use a word program to insert puppy dog clip art onto a blank document. Type the wording and party details into the text box above the graphic and print.

Cake and cupcakes from here.
Puppy Party Theme - Food/Cake: If possible, have your cake or cupcakes match your party decor. Fun food to serve is a "dog bone" sandwich - cutout peanut butter and jelly sandwiches with a dog bone shaped cookie cutter (purchased at wal-mart or craft store).

Dog Party Games:
Put the Dog in the Dog House Game:
This game is a take-off on "pin the tail on the donkey" and was made with clip art and printed at Kinko's on a 3'x 2' vinyl. I purchased little card stock puppies (scrapbook store) and laminated them with clear contact paper. The kids loved this game!
Dog Trainer Says is another party game and is a variation of "Simon Says". Play this game like “Simon Says” and have the kids do dog tricks like: Sit, Stay, Rollover, Jump, Growl, Hide, Back-up, Play Dead, Bark, Turn around, etc.

More puppy party ideas for kids:
Face painting is always fun for little kids.


Whimsy-girl constructed a dog house out of a cardboard box - so cute with the roof shingles!

She also passed out sugar cookies (dog bone shaped) for the adult guests. More photos here.

Invitation from Design Editor.
Design Editor - "On the invitation: Guests were asked to "Join us for puppy chow and a howlin' good time!" The who, what, when, where turned into Come! Stay! Rollover! and best of all, "ARF" RSVP.

Directions to make easy dalmation dog ears hat.

Print your own puppy origami for free.


Personalized Blue Dog House Each

Personalized Blue Dog House Each


Instructions on how to make these cute puppy cake pops here.

How to Make a Balloon Puppy:


Puppy Ear Headbands
Kooky Chew Candy Each
Puppy Cookie Favor


Dog Bone 20" Pinata Party Supplies