Thursday, April 30, 2009

Baby Celebrations

30 days has some more party ideas. This time they are baby shower ideas:

There are some amazing showers going on out there. Here are my favorites:
A baby sprinkle from Celebrations at Home
M. Writes' baby boy shower
Twin girl baby shower &
sweet baby shower from imperfect


My Insanity's She's About to Pop shower
Chasing Spayde's little birdee soiree
Project Nursery's backyard shower
Kara's party ideas' baby girl shower
dgoddess blog's baby girl shower part 1 & 2


Also check out:
Blissfully Domestic's baby shower round up
and Tip Junkie's baby shower category

Have you thrown a fabulous baby shower lately?

Sunday, April 26, 2009

More Birthday Party Links

30 days has a new great list of birthday party ideas. Tara wants a flower party and I love the party favors from the Flower themed party.

Connor wants a Robot party...any ideas?

Without further adieu here are the ideas on the 30 days website:


Caroline's circus party


Good Knight Party from My Insanity

Olivia birthday party from The Gibbons
(cake by Linsay)


Flower themed party from Creative Parties & Showers


Totally Awesome 80s party from Kara's party ideas
(this a great resource for parties- love this blog!)


Little Miss birthday party featured on Hostess Blog
(from polka dots and pirates- great blog here)


Another version of The Hungry Caterpillar party ideas from Be Different...Act Normal


dgoddessblog's car party 1 & 2


A few more worthy links:


DIY detective invites from Oh Happy Day

Check out Cookie Mag's birthday parties
Real Simples themed birthday parties
and their birthday section in general
Family Fun's birthday section
One Pretty Thing's birthday round up
Do you have any fun parties you want to share?

Ribbon Capris

These Capris would look so cute on my little girl! I saw this at Make it and Love It:


I found these capri's at an "end of season" sale several months ago at Old Navy. That's one of my favorite hobby's.......finding a discount!! I only spent a couple of dollars on them and got a few different colors of ribbon to attach to the bottom. I used 11 pieces of varying width ribbon for each leg, cut them each 3 inches long, heat sealed the ends with a lighter, and then pinned them to the bottom of the capri's (while inside out), 1/4 inch apart.


I sewed around the capri leg once, and then another time, really close to the bottom edge.


Turn them right side out and let your little lady slip right into them. She'll love 'em.

Deep Dark Chocolate Truffle Cake

Bakerella has inspired me once again! This sound so fabulous. I am very bummed it is Sunday and so I can't run out and buy the ingredients right NOW!:


Dark Chocolate Truffle Cake


My cake fell … and it was fantastic! Actually, it was supposed to fall. It's a recipe for a flourless chocolate cake that I used straight from the pages of Paula Deen's Chocolate Celebration Magazine.

Paula Deen's Chocolate Celebration

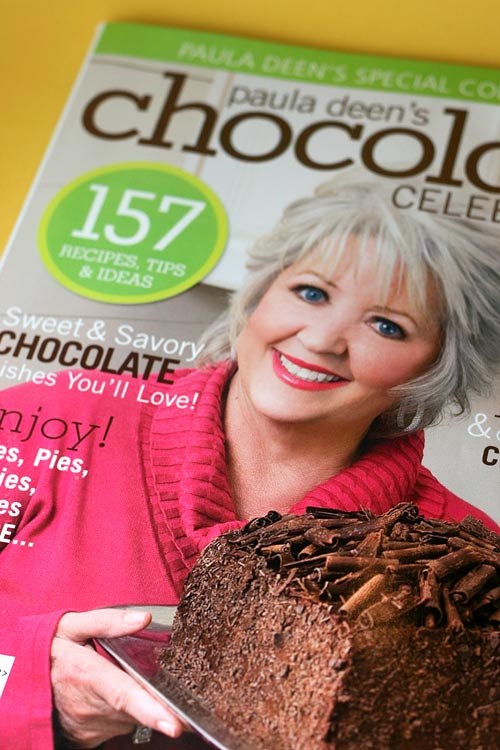
I bought this publication several months ago mainly because of the cover… Chocolate and Paula… you can't go wrong there. But, to be honest I haven't made anything from it until this Saturday. I've looked at it a bunch of times and made notes of all the recipes I want to try, but nothing until now.

So, this weekend, I finally decided to go for her Deep Dark Chocolate Truffle Cake Recipe because I've never made a flourless cake before and I was intrigued.
I mean, it must be pretty good if someone would make it instead of the one on this cover.

Springform pan

You'll need a 9-inch springform pan. It has a latch on the side that helps you release the cake. Because there's no turning this one upside down to get it out.

Place some parchment paper on the bottom so it hangs over. Close the latch to hold the paper in place and secure the sides. You'll also want to spray the paper with some non-stick cooking spray just to be safe.

After your pan is ready, preheat your oven to 325 degrees.

Separate 6 large eggs. Yolks in one bowl and egg whites in another. Set aside.

Melting Chocolate

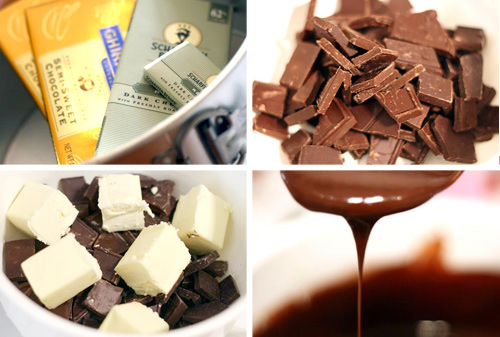
You'll also need 8 oz. semi-sweet chocolate and 4 oz. dark chocolate. Break it up in a large bowl and add 2 sticks of butter (thank you Paula!). Melt in the microwave at 30 second intervals, stirring in between until completely melted and smooth.

Whisk in 1 1/4 cups sugar until combined.

Then add the six egg yolks to the chocolate and sugar mixture, one at a time, whisking after each addition.

Beating Egg whites

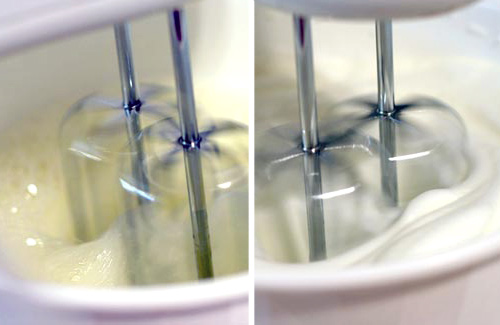
Now, in a medium bowl, beat the six egg whites on high with an electric mixer. Beat it for several minutes until stiff peaks form.

Yum!

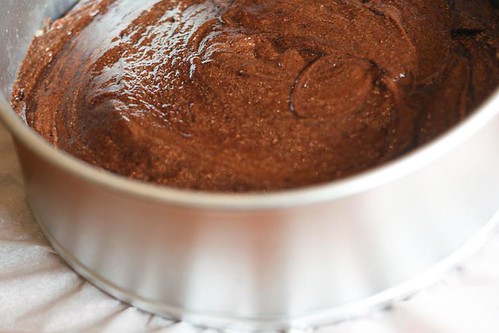
Then, gently fold your egg white mixture into the melted chocolate mixture until combined. Pour it in your pan and bake for 1 hour at 325 degrees.

Cracked and getting ready to fall.

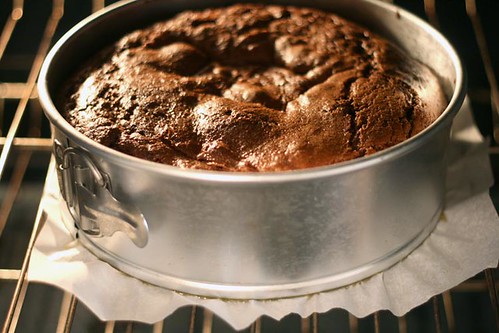
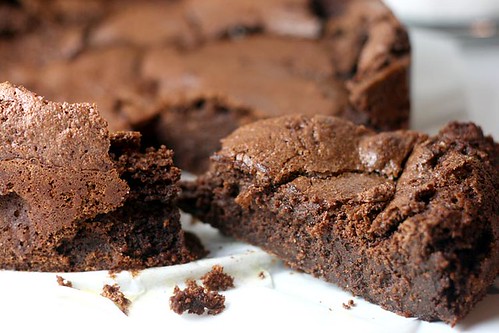
It will rise pretty high in the oven, but when you take it out to cool, it will fall. And fall hard. Yay!

Let it cool one hour on the counter and then for at least four hours in the refrigerator before you release it from the springform pan.

Deep Dark Chocolate Truffle Cake

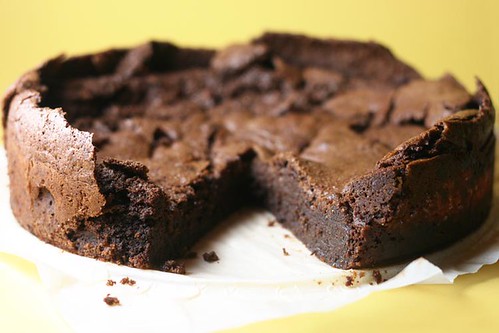
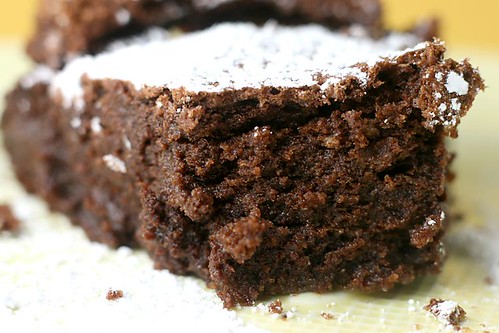
And, when you finally do… it will be worth the wait. I didn't really know what the texture of the inside would be like, but oh my… it was glorious.

Rich and dense and fudgey! Definitely one for true chocolate lover's. And, If you don't like things too rich, then stay away. Stay far, far away!

Flourless chocolate Cake

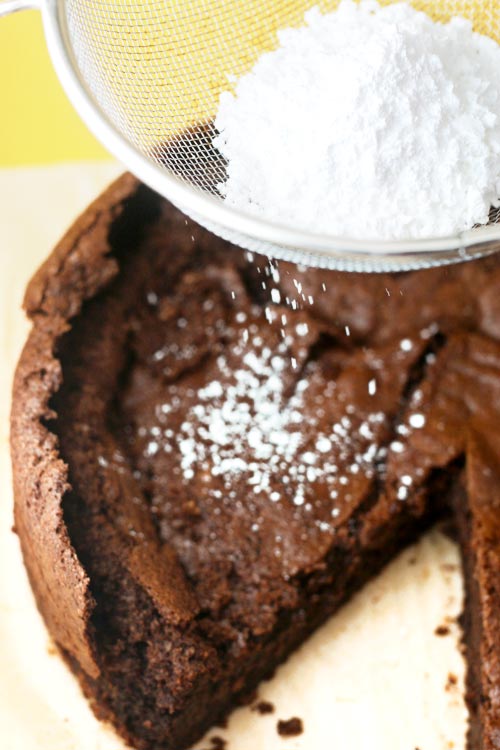
I also sprinkled a little powdered sugar on top to finish it off.

Fudgey!

Okay, a lot!

Paula Deen's Deep Dark Chocolate Truffle Cake

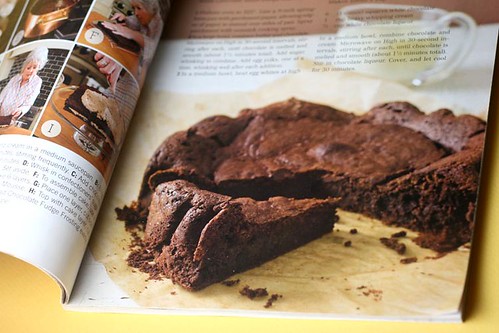
Here's what it's supposed to look like. Mine had a few more cracks, but I was completely and utterly happy with it.

Saturday, April 25, 2009

Luck Letter Blocks

Seriously, this girl Tara at It's a Girl Thing does the cutest letter blocks. Here is her St. Patrick's day ones:

Wednesday, April 15, 2009

Spring Wood Letters

Darling Spring blocks from It's a girl thing:

Sooo....here are my NEW "Spring" blocks! We will be making these for our next Craft Club get-together...and although there WILL be a few things I "tweak"...such as the size of some of the letters & the paper on one of them....I am pretty dang proud of them!
This is the first wood project I have done FROM SCRATCH!! I drew up the letters...and had our wood supplier cut them out (that's next...buy my own saws) and then went to town!


I am not a HUGE "tutorial-er" but I can give you some tips. Here are the steps that I took:

Materials:
-Wood letters
-Sanding Paper
-Stain
-Gloves (when staining)
-Rag (to wipe stain off)
-Brushes
-Mod Podge
-CUTE scrapbooking paper (I use a different one for each letter)
-Scrapbooking distressing ink
-Pencil
-Scissors
-Scrapbooking Adhesive
-Pop-Dots (another kind of scrapbooking adhesive)
-Glue gun & glue sticks
-Craft wire
-Wire cutters
-Ribbon
-Flowers
-Any other embellishments you prefer

1. Stain the wood at least TWO days prior to beginning project. I would first sand down any rough edges, wipe off the sawdust, and then stain the wood letters.

2. Then - trace the letters onto your paper. I trace it on the back...so you can't see any pencil lines. I then trace inside of those lines - about a centimeter - and THAT is the one I cut out. I like my paper to sit just a little inside the wood.

3. I lay the paper on the wood to see what it looks like..and then "tweak/cut" any areas that need a little fixing up.

4. I like to ink the edges of the paper..it gives it a more finished look....in my opinion. I used a ligth brown on these blocks.

5. Mod podge!! Paint a light layer of mod podge on the first block - then quickly lay the paper on top. Carefully run your fingers over the paper, get any bubbles out, and push down all around the edges. Do NOT put mod podge on top....yet! This is a trick I learned...I do the top layer AFTER this coat dries....this reduces the risk of the paper bubbling up. Finish putting paper on all of your blocks. Don't rush this part. The more time I take, the better they always turn out!

6. When the first layer has dried - I then paint a top layer of mod podge on top of the paper and wood. Make sure to get any drips off the sides of the wood....if there is a lot dripping down, it will dry white!

7. I let this completely dry before adding embellishments (ribbon, flowers, rhinestones, etc.)

8. For the "I" ...I had them drill holes in the flower part AND the "i." I then took some of my craft wire, folded a piece in half, wrapped it around my pencil - to get the twisted look, and then trimmed it down to the size I wanted. I put some glue (from my handy glue gun) in both holes, and then stuck the wire in the holes....and held onto it until the glue dried. I then had to maneuver the wire a little until it looked JUST the way I wanted it to.

9. Add your ribbon, flowers, "bling, bling" where-ever you please!

10. Sit back, admire your craft, and make sure that everyone who passes by hears you say, "I MADE THAT!" Tee, hee!

Hopefully this little tutorial is enough to help some of you crafters out there do a little project like this one. Feel free to ask questions if you are confused! Good luck!

Ribbon Scrap Jar

Ribbon Jar from An Altered State of Mind:

This next project was a little funky - it's a ribbon jar to hold ribbon scraps. I punched holes in the lid and decorated the front of the jar. I used Zoe Pern's Fun For Me kit. I LOVE this kit - I love all of Zoe's designs!!!

Saturday, April 11, 2009

Dirt Cake

This was a cute idea from Heather Dr:

For the baby shower, in addition to the cookies I made for favors, I also made a bugs-themed cake--you know, for dessert. :)


I used my big jelly roll pan (10.5 x 15.5") and made a gigantic chocolate fudge cake. And OK, I'll admit it. I cheated. The cake was from a box. Good ol' Betty came to my aid yet again. (It was good stuff.)

Once it was done, I did cut it into two layers. The filling? Oreo buttercream. Then I frosted it with vanilla buttercream that I colored bright green. I put a couple handfuls of Oreos through the food processor to make "dirt," and then spread that around on the top of the cake in a big rectangle. Then, using one of my Wilton piping tips, I piped all of that awesome looking grass onto the top edges and the sides. It was a bit of a pain in the ass, but it was worth it in the end. I absolutely loved how this turned out.

To finish it all off, I placed several gummy worms on top, then made a little sign with a quote on it that tied the cake back into the "baby boy" shower theme. "Boys are meant for kisses and hugs, for watching rainbows, and catching bugs."

Perfect!

We didn't stop with just a "dirt and grass" decorated cake. No, sir. On Friday night, when were doing the food preparation at my mom's, Marie and I also threw together a "real" dirt cake. And we served it right out of a bucket!

It was the cutest. Vanilla pudding, cream cheese, cool whip, butter... all mixed together and then layered with... you guessed it, more "dirt." The dirt for this dessert was made up of about 1.5 packages of Oreos. It was a lot of dirt!

Topped it off with more gummi worms and stuck a small bunch of fake flowers in it. Also made another little sign with another quote on it that related to boys and dirt. "Trucks and dirt and shades of blue, little boys are angels, too." Put together, and with the rest of our decor, it was really quite adorable.

Here is what it looked like once it had been mostly devoured. It was a huge hit! (Such a hit, in fact, that Kara's 6-year-old cousin told me she wished I was her mommy! *gasp* It was really sweet, I just wish she hadn't said it right in front of her real mommy!)

I wasn't sure how many people were going to want to eat the dirt cake AND the chocolate cake, but everyone wanted both. Since the dirt cake was kind of like "cookies and cream," it went really well with the chocolate cake--it served as a good ice cream substitute. In case you're interested in trying this out, I'll share the recipe that we used.

Dirt Cake
(Source: Allrecipes.com)

Ingredients:
- 1/2 cup butter, softened
- 1 (8 oz.) package cream cheese, softened
- 1/2 cup confectioner's sugar
- 2 (3.5 oz.) packages instant vanilla pudding mix
- 3 1/2 cups milk
- 1 (12 oz.) container frozen whipped topping, thawed
- 32 oz. (2 packages) Oreo cookies

Directions:
1. Chop Oreo cookies very fine in a food processor. The white cream will disappear.

2. Mix butter, cream cheese, and sugar in a bowl.

3. In a large bowl, mix milk, pudding mix, and whipped topping together.

4. Combine pudding mixture and cream cheese mixture.

5. Layer in flower pot or bucket, starting with cookies, then cream mixture. Repeat layers.

6. Chill until ready to serve.

7. Add gummy worms, artificial flowers, and trowel. Enjoy!