Showing posts with label Boxes. Show all posts

Wednesday, November 17, 2010

Baby Carriage

Look how sweet this baby carriage is:

I originally saw it on Dannie's Designs. But she gives a link to the blog that she saw it on.

Sunday, November 7, 2010

Cute and Simple Box


These little boxes From Dawn's Stamping Studio are so cute. I am making 22 of them to give to the teachers in our Primary...

Saturday, March 6, 2010

New Take on the Gharidelli Box


This site has a very cute Ghiradelli box.

I originally saw it here.

Thursday, July 30, 2009

Scallop Envelope Box


One day when I buy the scallop envelope die cut, I will make this darling box. I found it on Stampin' Pretty. She has a great tutorial on her site.

Apparently I have been doing a no-no in coping and pasting (called hot-linking)from people's blogs. I always give them credit but i guess when you copy and paste, it uses there bandwidth for you all to view their info even if it is on my site. I am a big dummy when it comes to how you are all viewing this stuff. I just know it works...somehow. So I am sorry to those of you that I have copied and pasted your info. I just really like your work. Hopefully this is the correct way to do it.

Saturday, July 25, 2009

Double Box Holder

Double Box Holder with Dawn

Double Box #2 Holder front view Hi Stampers:

Here are the supplies I will be using in todays video :

Big Shot #113439

Box #2 Bigz Die #114518

Oval all stamp set #113790

Scallop oval punch#114889

Double box #2 holder top view Chocolate chip 5/8 GG ribbon #109055

To the Nines Designer paper Specialty # 114038

( you will need 1 Sheet of 12 X 12 )

Wide Oval Punch # 112082

Sticky strip #104294

Dimensionals #104430

Until later... Happy Stampin!

Shopping online with Dawn

Tuesday, June 30, 2009

Top Note Box

Top Note Box

This is a cute idea from Chic' n Scratch and I just got the Top Note Die Cut. I am excited to try this little box out:

Hi, my video today demonstrates how to make this Top Note Box.

Enjoy!

Top Note box inside

Stamps: Lots of Bots & Teeny Tiny Wishes

Ink: Not Quite Navy, Celery & Black Stazon

Cardstock: Not Quite Navy, Walk in the Park Designer Paper & Whisper White

Other: Top Note Die, Modern Label Punch, Word Window Punch, Big Shot Die Cut Machine, Blender Pen, Silver Brads, Paper Piercer, Mini Glue Dots, Stampin' Dimensionals & Chic Stand

Monday, June 22, 2009

Stationary Box

Very cute stationary box I found on Creative Itch:

I'm always on the hunt for simple, cheap, and cute craft ideas. I hit the jackpot when I stumbled on this cute stationary box!!

When you take the lid off, it opens up to look like this. It has a place for your cards, cute little 3x3 cards, and some tags. The little notebook you see is an address book, and there's a place for stamps and a pen. Isn't it just adorable?
Here's the cards and tags I made. There's a total of 4 of each.

Thursday, June 4, 2009

Ghirardelli Chocolate Box

I have decided to do a Stamp Camp for the girls in my area this summer. So I will be putting together some ideas here of what to do. I am loving this little Ghirardelli chocolate box. In fact maybe I will use this at the party favor for a shower I am throwing.

Make a box to hold four Ghirardelli® chocolates.

Supplies

  • One 4 1/4" x 8" piece of cardstock

  • One 2" x 8 1/4" piece of patterned paper, optional

  • Paper Cutter

  • Scoring Tool, Scor-Pal™ used here

  • Scor-Tape™ or other strong adhesive

  • Scissors

  • Foam Tape or pop dots

  • Stamps

  • Ink

  • Additional Cardstock

Step-by-Step

  1. Step 1

    Score the short side of your cardstock strip at 1" and 3 1/4".

    Hint:
    When using the Scor-Pal™ score at 1", then turn paper 180 degrees and score the other side at 1" again.

  2. Step 2

    Score your long side at 2", 3", 5" and 6".

  3. Step 3

    Cut off the outer strips 3" up on one end. This will create your box flap.

  4. Step 4

    Use a bone folder to crease score lines.

  5. Step 5

    Cut the 1" score lines on both sides.

  6. Step 6

    Add Scor-Tape™ both 1" x 2" strips next to the box flap.

  7. Step 7

    Flip your cardstock over and add tape to the 1" tabs.

  8. Step 8

    Remove the tape liner from the 1" tabs and fold inward.

  9. Remove the liner from the 2" strips and bring sides together to form box.

  10. Step 9

    Trim box flap. Here, it was cut down 7/8".

  11. Your box is done. It's time to decorate it.

  12. Step 10

    Apply adhesive to the back of the patterned paper.

  13. Step 11

    Adhere patterned paper around your box.

    Note:
    The ends of the paper will overlap a bit.

  14. Step 12

    Create a closure for the box by stamping or punching a small image.

    Add foam tape on the lower part of the back of that image.

  15. Step 13

    Remove liner and adhere the punched piece to the lower part of your box so that the lid can slipped underneath.

    Fill with chocolate.

  16. Your box is finished. You can find it here in the gallery (with a listing of all supplies).

Another cute take on the same box from Rochelle:

This is another project that we did at stamp camp. It is a box that holds Ghirardelli® Chocolates. There is a tutorial on splitcoast which you can find here. However, our box only holds three chocolates, the one on scs holds 4. It was super easy to make too. Another fun gift to give to teachers. Just remember that when you put the dimensionals on to put them on the bottom of the scallop so you can tuck the lid under the top of the scallop to keep it closed.

Paper: Always DP, Pink Pirouette, Pumpkin Pie, Regal Rose
Accessories: SU Scallop Border Punch, SU Scallop Circle Punch, SU Hearts Punch, Dimensionals, Tacky Tape, Ghirardelli Chocolates

Sunday, May 24, 2009

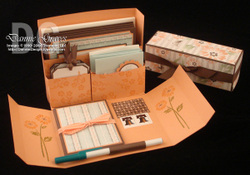
Stationery Box

Very cute Stationery box from Little Birdie Secrets:

I found the cutest stationery box made by one of our readers and stuck it in my "to-do file" for later. Wouldn't this make a perfect Mother's Day gift? While looking for a pattern that I could link you all to, I found another blogger that actually has an awesome video tutorial showing step-by-step how to make this darling box. It's got pockets to fill with handmade cards, gift cards, and tags, as well as stamps and an address book. My favorite part is how they all coordinate!

Thanks to Stampin' Up! demonstrator Dannie Graves for letting us share her pictures and link to her video with you! She makes the whole project really simple. Isn't this a beautiful set?


Reader Tiffany Cordero, winner of our card swap contest and also a Stampin' Up! demonstrator, made these sets--LOVE the color combos!

You've still got 10 days until Mother's Day (or should I say only 10 days?). Either way, you have time to make this box and a bunch of cards. Your mom is going to love it. {You're welcome.}

Sunday, March 15, 2009

Toppings Box

This is a cute little box from Capture the Moment:

One of the most important parts of ice cream sundaes are the toppings! I designed a small box that holds four of our 4 oz. Round Clear Top Tins perfectly. I have attached a template outlining specific directions on how to make it. Super easy pattern to follow.

Download toppings_box_template.pdf

Box_bottom_liner After I constructed the box, I made a liner to fit inside the bottom. I thought that this would add some sturdiness and serve as a decorative element as well. I created the liner by following the same template as the box bottom, only removing the corner tabs. I also scored just hair further inward. The liner is made from Vintage Cream cardstock and stamped repeatedly with the snowflake border image from Heather's new Rustic Snowflakes set.

.........................................................................................
Lined_box_bottom Here is the liner securely adhered inside the box bottom. I think it really makes the box look more polished, don't you?

.........................................................................................
Glue_dots The lid of the box is created with a transparency sheet. After a little experimentation with different adhesives, I was happiest with mini glue dots. They were hardly noticeable and looked clean & professional.

.........................................................................................
Filled_topping_tins The tins were covered with a strip of Pure Poppy cardstock stamped with a row of different phrases & small snowflakes from this set in vanilla ink. I filled the tins with a variety of toppings that would be appropriate for a sundae. The four ounces that these tins hold will provide enough topping for at least six sundaes, so perfectly suited for an entire family! Yum!

.......................................................................................
Finished_toppings_box Here is the finished toppings box. I used the NEW! Silver Sheer Metallic Ribbon to tie around the box. The tag background was created with a few of the snowflake images from this set. I just love how easy it is to build patterns with this set. And the snowflakes stamp SO crisp & clean.

......................................................................................
Simple_alpha_tag For the tag accent strip, I started by die-cutting the smallest Double-Ended Tag die from Vintage Cream cardstock. I left the cardstock in the die and used the opening as a means to perfectly center the phrase "toppings", which was created with Simple Alphabet. (You can find a tutorial I did on how to best position the Simple Alphabet letters HERE.)

......................................................................................
Scoring_tag_strip_2 I cut a strip of red cardstock just a tad wider than my tag die and scored a line just a fraction from either edge using my Scor-Pal. This is a technique I find myself doing often. I just love the results.

......................................................................................
Toppings_tag By layering the tag and the strip, I am able to create an easy accent that adds quite a bit of detail so the tag isn't too visually *boring*!

......................................................................................
Hot_fudge_lid_supplies Next up was the hot fudge! You can't have a sundae without hot fudge! I picked up an 11.75 oz. jar of Smucker's Hot Fudge Topping. It is as close to homemade as you can get from the supermarket! I wanted to dress it up a bit to make it more personal (and color coordinate of course!). I die-cut some muslin fabric using the Nestabilities largest Standard Scalloped Circle die. I stamped the fabric with Polka Dot Basics using Pure Poppy Palette ink. I also got some thin hemp twine out.

....................................................................................
Hot_fudge_upside_down I placed the fabric circle pattern side down. I then turned the hot fudge upside down and placed it in the center of the circle.

.....................................................................................

Hot_fudge_with_elastic I gathered the circle of fabric around the neck of the jar and placed an elastic around it to hold it in place temporarily.

..........................................................................................

Hot_fudge_twine_addition_2 I then tied the hemp around the jar, holding the fabric firmly in place, allowing the hemp to rest in the grove directly under the lid.

...............................................................................................

Finished_hot_fudge Remove the elastic and there you have it! A homier, customized version of Smucker's Hot Fudge Sauce!

.............................................................................................

Personalized_bowls_2 Something special needs to be included in this gift set to EAT these special sundaes out of, so why not some personalized bowls? I stamped one of the small snowflakes from this set in Pure Poppy onto one of Avery's clear address labels. I punched out the snowflake using my 5/8-inch circle punch. The name was stamped onto a clear label using, once again, Simple Alphabet. It was trimmed with scissors. I adhered both labels to the bowl. Since I used Palette inks for the stamping, they are waterproof. With hand-washing, the labels ought to stay around for quite while, although probably not permanently.

.............................................................................................

Let_is_snow_basket_card Here's the completed ensemble. I added a really nice ice cream scoop and assembled everything in this pretty little basket.

...........................................................................................

Let_it_snow_card A cute little card was necessary to hold a gift card to the local supermarket for the recipient to use to buy the *best* ice cream, with no worries of what's on sale! Much of the same design concepts used on the *toppings* tag were carried over to the card. A bit more of that Silver Sheer Metallic Ribbon was added to the side as an accent.

...........................................................................................

I hope you have enjoyed today's project. Be sure to stop by tomorrow for a peek into another set that I have been just dying to share with you!