
Showing posts with label Halloween. Show all posts
Showing posts with label Halloween. Show all posts
Monday, November 22, 2010
Preschool Pumpkins
Someone made the cutest little Thanksgiving dish for preschool. They peeled a whole bunch of mandarin oranges and put a pretzel rod in the middle to make them look like pumpkins. Look how cute:


Monday, September 7, 2009


Tuesday, February 10, 2009
How to Boo
Skip to my Lou tells how to start the Boo for Valentines:
I can already feel the anticipation and excitement in the air—-days are cooler and Halloween is coming. One of our favorite traditions is “Booing.” I look forward to creating special “BOO” treats while my kids look forward to the ‘ding and dash’. As I watch them stealthily move across the front lawn only to hurriedly (and haphazardly) fling my creation at the front door—clearly I realize we get different things from this activity. We do all have a blast!
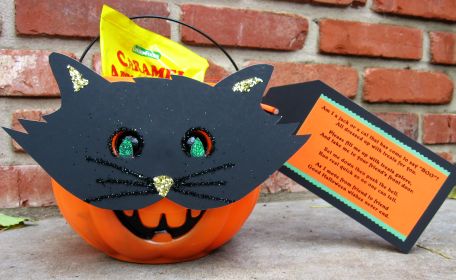
Most “Booing” involves having to photo copy instructions. We instead create a container that travels from door to door. The only thing the recipient needs to do is enjoy the goodies, refill the container and place on another friend’s door. Some people refuse to pass the container along (you know who you are) so we make a few in hopes they start making the rounds.
I am showing you what we did last year—because this year’s is TOP SECRET! We filled plastic pumpkins with supplies to make caramel apples and then ‘dressed’ it to look like a cat.

Simply cut out a cat face. You may use ours if you like.
We cut our faces out of black poster board and then embellished with glitter. Be sure to check the space between the eyes on the plastic pumpkin. I noticed not all of these pumpkins are the same so the placement of the eyes might need to be adjusted. Hot glue the center of the mask to the front of a plastic pumpkin (we bought ours from Wal-Mart).
We attached the following booing poem to the handle.
Am I a jack or a cat that has come to say “BOO”?
All dressed up with treats for you.
Please fill me up with treats galore,
and take me to your friend’s front door.
Sit me down then push the bell.
Run real quick so no one can tell.
As I move from friend to friend,
Good Halloween wishes never end.
You might be interested in our ideas from previous years “Booing”
How to Boo (with PFD booing poem downloads)
So lets get busy and let the “Booing” begin!
You may find other ideas for celebrating Halloween here.
Halloween Party and Decorations
From Life Frosting. I LOVE THE CANDY CORN IN THE VASE idea:
Here it goes, the complete Halloween Party run-down!
Here it goes, the complete Halloween Party run-down!

Invitations were SO simple. We used the saying:
"It's a Halloween Party
You're in for a Scare
Prize for best costume
Be there if you dare!"
You'd be Ghoulish not to attend!
(please find babysitting for a haunted night out!)
PREPARATION:

Melissa and Kristin (who cohosted the party) came over a couple days before to set up the table. We used black fabric, silver webs, pewter dishes and black candlesticks, plates & napkins.

We set up the dessert table and drink bar the day of...(I couldnt close those rooms off to the kids!)
 DAY OF...

I only used tea lights in paper bags to decorate the front, a couple pumkins and a wreath.

This poster was right in the entry...I wanted to let people know they were in for some fun games! (and to stick around for the costume contest!

We made sure to have great prizes for the costume winners. Everyone voted, and we had some clear winners! We decoupaged the black and white paper to the lids of the jars to match the theme.

Of course we needed candy on the table! I also put out halloween books to look at. We had halloween movies playing on the tv on mute and then had Halloween music in the background.

The finished table with food. Miranda came up with all the food labels! I emailed her a list of food and within minutes she emailed me back a list of names!
Tortilla chips: torn skin crisps
Chili dip: brains and beans
Tomato, bean, corn, cilantro salsa: pick in your eye-o
7 layer dip: 7 feet under
Normal red salsa: vampire blood
Sourcream dip: rabid dog froth
Green salsa: pile of bile
guacamole: cold mold
Baguette slices: fresh flesh
Spinach dip: creamed ghost gizzard
Hot artichoke dip: choking heart parts
Hot water: burning acid
Hot cocoa mix: ground sweet bones
Marshmallows: ghost cutlets
Bubbly root beer: hell broth
Ice water with scary ice: goblins bath
Pumpkin pie: jacko’s flesh pie
Whip cream: ghost guts
Chili dip: brains and beans
Tomato, bean, corn, cilantro salsa: pick in your eye-o
7 layer dip: 7 feet under
Normal red salsa: vampire blood
Sourcream dip: rabid dog froth
Green salsa: pile of bile
guacamole: cold mold
Baguette slices: fresh flesh
Spinach dip: creamed ghost gizzard
Hot artichoke dip: choking heart parts
Hot water: burning acid
Hot cocoa mix: ground sweet bones
Marshmallows: ghost cutlets
Bubbly root beer: hell broth
Ice water with scary ice: goblins bath
Pumpkin pie: jacko’s flesh pie
Whip cream: ghost guts
Apple slices: bat nibblets
Caramel dip: sweet joint juice
cream puffs: mummy eyeballs
Brownies: death by chocolate
cream puffs: mummy eyeballs
Brownies: death by chocolate


I cant believe I dont have a picture of the drink station in action.
We had hot water and hot chocolate, and the coolest looking rootbeer that we kept adding dry ice to. Then water with ice that had spiders in it.


Bobbing for Apples. I got these great tins at Lowes for 15.00 each. I figure I can use them every year...and they would be great for a big bbq with sodas!

We strung a rope from 2 trees and then hung 10 stings from it to hang the doughnuts! We had at least 20 participants!
 Prizes for all winners/participants that wanted them!
Things I would have done differently:
of course we had too much food...but that means lots of left overs!

OK, I love fall candy...It is kind of hard to do this with kids nowadays, but I still keep a couple jars around. I stuffed the middle of these jars with newspaper or paper towels so I didn't have to use so many bags!

OK, I love fall candy...It is kind of hard to do this with kids nowadays, but I still keep a couple jars around. I stuffed the middle of these jars with newspaper or paper towels so I didn't have to use so many bags!
Pumpkin Poop
Found on It's all in my head:


I started to carve a pumpkin with my carving knife and scoop, But the pumpkin got so scared He took a little poop! It looked so cute and funny just like a candy treat so I'm sharing it with you now because you are so sweet!
Monday, February 9, 2009
Advent Calendars
This Advent Calendar is a cute idea from Just a Girl:
 Well here it is!! I've done 7! That's right. 7!! To be honest, the only difficult part is waiting for the spray on the boxes to dry. Otherwise, it moves along quite nicely. Remember, I'm a scrapbooker who doesn't scrapbook, so the details in this were quite fun. I bought some ultra strong magnets and glued them to the back. Each day, my kids will count down by opening the day's box and finding a goody! They're sooo geeked for it already.
 Here is a Christmas Advent made from a mini muffin tin from Heartland Paper.
 Well here it is!! I've done 7! That's right. 7!! To be honest, the only difficult part is waiting for the spray on the boxes to dry. Otherwise, it moves along quite nicely. Remember, I'm a scrapbooker who doesn't scrapbook, so the details in this were quite fun. I bought some ultra strong magnets and glued them to the back. Each day, my kids will count down by opening the day's box and finding a goody! They're sooo geeked for it already.
 Here is a Christmas Advent made from a mini muffin tin from Heartland Paper.


This is the fun Halloween Countdown frame that Kelly made on Heartland paper. Here is the information that you need to make your own frame at home.

Ingredients:
1 12X12 frame painted cream
1 yard each of 8 ribbons
1 12X12 background paper (Kelly used We-R Memory Keepers Halloween)
1 die cut web paper
1 American Crafts Thickers Sheet
QuicKutz lettering or other sticker lettering
Adhesive
Scissors
31 pieces of wrapped candy
Instructions:
1. Adhere web to 12X12 background paper
2. If using QuicKutz, cut letters from cardstock. Adhere lettering to top of web. Kelly used different fonts to create a whimsical effect.
3. Place dots from Thickers sheet around web points
4. Tie 31 ribbons around the edge of the frame. As you knot the ribbon, place a treat in the knot.
5. After all ribbons are tied, put 12X12 paper with web into frame.
6. Have kids untie one ribbon each day until Halloween.Halloween Advent Calendar
I am really liking Brooke at Crafting Chicks
 Since it's the beginning of October, I wanted to do a quick project with my kids since they are always asking me "when is it going to be Halloween!" So I made a simple Halloween countdown for them so they can know exactly how many days until Halloween.
I just used an 18x18 inch magnet board for the base. Then I created 31 round mini "layouts" in Photoshop Elements (using the digital kit "Batty For You" available at www.ggdigitaldesigns.com), printed them at Costco on luster photo paper, and cut them out. They ended up being 2.5 inches in diameter. I used a 3 inch scallop punch and punched out 31 scalloped circles from black cardstock, then adhered the numbered circles to the scalloped circles with double-sided tape. Then I simply added a magnet to the backs of the circles and ribbon at the top of the magnet board, and I was done! My kids even helped me tape and put the magnets on. It was a fun, inexpensive project and they are excited to put a new magnet on every day. You could really do this for any holiday or countdown.
Let me know if you have any questions at all! :) Happy October!
Subscribe to:
Posts (Atom)


