
Showing posts with label Cards. Show all posts
Showing posts with label Cards. Show all posts
Monday, September 7, 2009

Tuesday, June 30, 2009
Top Note Box

This is a cute idea from Chic' n Scratch and I just got the Top Note Die Cut. I am excited to try this little box out:
Hi, my video today demonstrates how to make this Top Note Box.
Enjoy!

Stamps: Lots of Bots & Teeny Tiny Wishes
Ink: Not Quite Navy, Celery & Black Stazon
Cardstock: Not Quite Navy, Walk in the Park Designer Paper & Whisper White
Other: Top Note Die, Modern Label Punch, Word Window Punch, Big Shot Die Cut Machine, Blender Pen, Silver Brads, Paper Piercer, Mini Glue Dots, Stampin' Dimensionals & Chic Stand
Flower Pot Pocket Card

Here is a very cool pocket card from Sunny Stampin':

I’m sure you’re all familiar with the Flower Pot Card – it was wildly popular early on in the year (January/February) – and featured on blogs all over the place. I was checking out a few of the many samples posted and came across a tutorial on Stephanie Luman’s Blog. As I was reading through her great tutorial, I was suddenly hit by a thought – what if, rather than having to carefully measure and cut the angles on the flower pot base, I created a printable template?
Why a printable template? I’ve found that in my classes, when dealing with a finished project that has angles, mistakes are less common when I used printable templates, plus they’re a lot faster. So that’s what I’m going to share with you today. I drew out a template for the flower pot base and then put two on 1 page. The template is true to size which means that you don’t have to shrink or enlarge it - it’s already at the finished size. All you do is print it out directly onto your cardstock or designer paper. Each 8 1/2″ x 11″ page you print will give you 2 flower pot bases. Below I have a picture of the base and the insert shown separately. My color choices, stamp set and DP inspiration came from THIS gorgeous card created by Brenda (don’t know her last name but she is known as Qbee on Splitcoaststamperes). You can see her blog HERE.
Now if you want to make a lot of these cards you’re probably not going to want to do all the cutting out of the flowers that I did, so that’s where your flower punches and/or Big Shot flower dies would come in.

First thing you’re going to need to do in order to make this card is to Download the Template HERE and save it to your computer. If using DP you are going to want to trim your DP sheet so that it is 8 1/2″ x 11″ (I left mine at 8 1/2″ x 12″ because my printer can handle it). Make sure you check the options on your printer and if you can, change the paper type to cardstock. Open up the template pdf and print out the template – BUT – if using DP make sure that you print on the REVERSE side of the pattern you want to be on the outside of the pot.


To create the insert you will need a 2 1/4″ x 4 5/8″ piece of Whisper White CS and a 2 3/8″ x 4 3/4″ piece of Kraft CS. I sponged the Whisper White CS with Baja Breeze Classic ink and stamped the greeting “Wonderful” on it in Basic Black ink. I centered and matted the Whisper White CS onto the Kraft CS.

Once I was done arranging the flowers the way I liked I stuck them on using a combination of Stampin’ Dimensionals, 2-way glue, mini glue dots and Snail adhesive. Once you’re done creating your tag, insert it into the card. Take a 14″ piece of Baja Breeze satin ribbon and tie it in a knot around the flower pot to hold it closed. You can see a close-up of the flowers below. I should mention that the finished size of this card with insert is 4 1/4″ x 5 1/2″, so it does fit inside a medium Whisper White envelope.

I hope you enjoyed this mini tutorial and have fun with the template!
Stamps: Wonderful Favorite (115144), Petal Pizzaz (113417)
Ink: Basic Black Classic Ink (101179)
Paper: Sweet Slumber Specialty (114037), Kraft CS (107070), Whisper White CS (100730), Baja Breeze CS (111352), Riding Hood Red (111348), So Saffron CS (105118)
Accessories: Button Latte (114333), Button Bouquet (112092), Baja Breeze Corduroy Buttons (114344), paper snips (103579), Snail Adhesive (104332), Mini Glue Dots (103683), Stampin’ Dimensionals (104430), 2-way Glue Pen (100425), Ribbon Originals Valet (114318)
Monday, June 22, 2009
Stationary Box
 Very cute stationary box I found on Creative Itch:
I'm always on the hunt for simple, cheap, and cute craft ideas. I hit the jackpot when I stumbled on this cute stationary box!!
 When you take the lid off, it opens up to look like this. It has a place for your cards, cute little 3x3 cards, and some tags. The little notebook you see is an address book, and there's a place for stamps and a pen. Isn't it just adorable?
 Here's the cards and tags I made. There's a total of 4 of each.
Thursday, June 4, 2009
Another Father's Day Card Tutorial
This looks so cute and easy from card of the week.com:
Click here for the tutorial.
Click here for the tutorial.
Origami Necktie and Shirt Card Tutorial (Video!)

I was surfing around on the Internet and came across directions for this origami necktie -- the perfect accessory for all those Father's Day shirt cards. I was trying to figure out how to make a tutorial that would be easy to follow and I decided to try video. Please comment and let me know what you think.
Card Box
I love the card box idea. It is so cute! Another great one from Rochelle:

We made this boxed card set yesterday at stamp club. Isn't it gorgeous? The box holds all six cards with envelopes. I am going to do more like this for teacher gifts. I love the colors of this set.
*Four of these cards are from Andrea Walford's Card Class By E-mail*
Here is a close up of the cards.
Stamps: Upsy Daisy
Paper: Basic Gray, Not Quite Navy, Kiwi Kiss, Baja Breeze, Whisper White, Urban Garden
Ink: Kiwi Kiss, Not Quite Navy
Accessories: SU Scallop Border Punch, Silver Brads, Mat Pack, Stamp-A-Ma-Jig, Kiwi Kiss Striped Grosgrain Ribbon
Stamps: Upsy Daisy
Paper: Whisper White, Not Quite Navy, Baja Breeze, Urban Garden DP
Ink: Baja Breeze, Basic Gray, Not Quite Navy
Accessories: Silver Brads, Mat Pack, Baja Breeze Striped Ribbon, Ticket Corner Punch, Stamp-A-Ma-Jig, Circle Punch
To make this box you will need 2 pieces of cardstock 7 1/2 inches by 7 1/2 inches. Score around three sides at 1 1/2 on both pieces. Cut flaps and put together to make a box. For the lid, cut cardstock 6 7/8 inches by 3 7/8 inches and scored 1 1/8 inches from the outer edges all around.
Sunday, May 24, 2009
Stationery Box
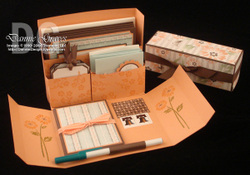
Very cute Stationery box from Little Birdie Secrets:
I found the cutest stationery box made by one of our readers and stuck it in my "to-do file" for later. Wouldn't this make a perfect Mother's Day gift? While looking for a pattern that I could link you all to, I found another blogger that actually has an awesome video tutorial showing step-by-step how to make this darling box. It's got pockets to fill with handmade cards, gift cards, and tags, as well as stamps and an address book. My favorite part is how they all coordinate!
Thanks to Stampin' Up! demonstrator Dannie Graves for letting us share her pictures and link to her video with you! She makes the whole project really simple. Isn't this a beautiful set?


Reader Tiffany Cordero, winner of our card swap contest and also a Stampin' Up! demonstrator, made these sets--LOVE the color combos!


You've still got 10 days until Mother's Day (or should I say only 10 days?). Either way, you have time to make this box and a bunch of cards. Your mom is going to love it. {You're welcome.}
I found the cutest stationery box made by one of our readers and stuck it in my "to-do file" for later. Wouldn't this make a perfect Mother's Day gift? While looking for a pattern that I could link you all to, I found another blogger that actually has an awesome video tutorial showing step-by-step how to make this darling box. It's got pockets to fill with handmade cards, gift cards, and tags, as well as stamps and an address book. My favorite part is how they all coordinate!
Thanks to Stampin' Up! demonstrator Dannie Graves for letting us share her pictures and link to her video with you! She makes the whole project really simple. Isn't this a beautiful set?

Reader Tiffany Cordero, winner of our card swap contest and also a Stampin' Up! demonstrator, made these sets--LOVE the color combos!
You've still got 10 days until Mother's Day (or should I say only 10 days?). Either way, you have time to make this box and a bunch of cards. Your mom is going to love it. {You're welcome.}
Thursday, May 21, 2009
Father's Day Card
Once Apon a Holiday has a very cute Father's Day card idea:
My son brought this darling card home from school for Father's Day a few years ago.
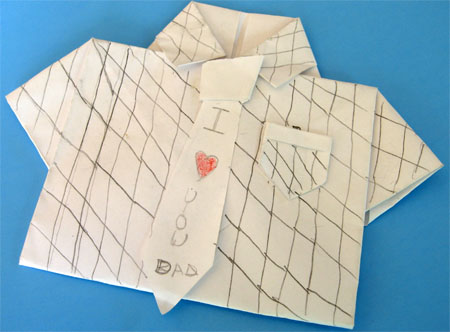
You open it up and there is plenty of room to write dad a sweet note.
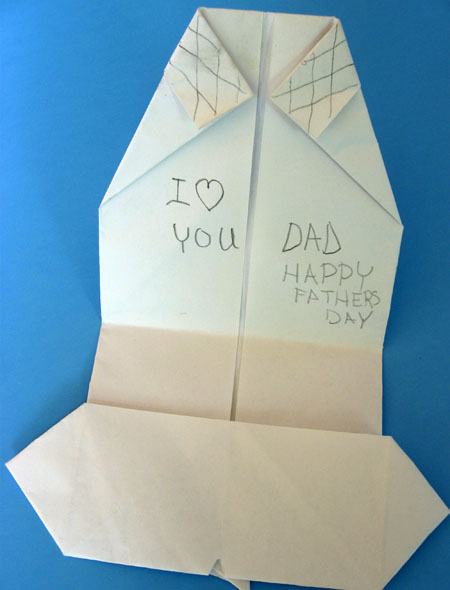
This card was actually really quick and simple to make. All you need is an 8 1/2" X 11" sheet of typing paper for the shirt and a scrap of paper for the tie.
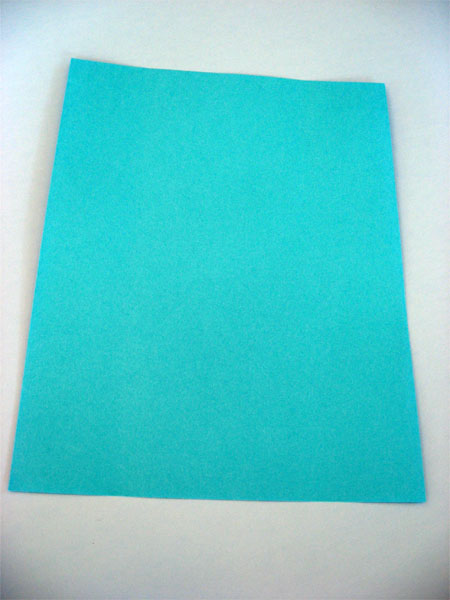
Fold each side in to the middle.
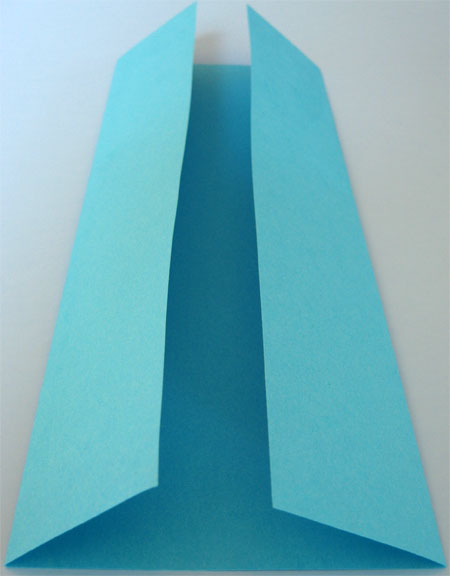
Open up the page and fold in the bottom corners.
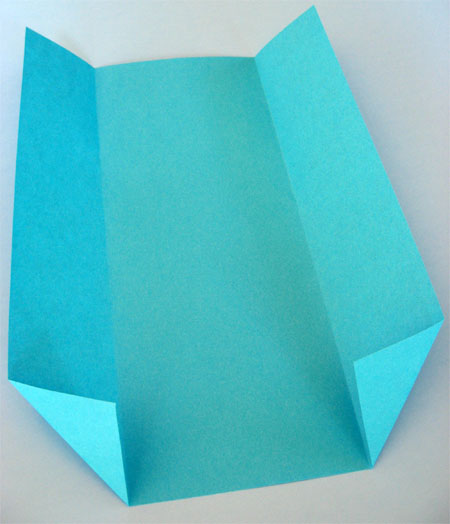
Again fold sides to the middle.
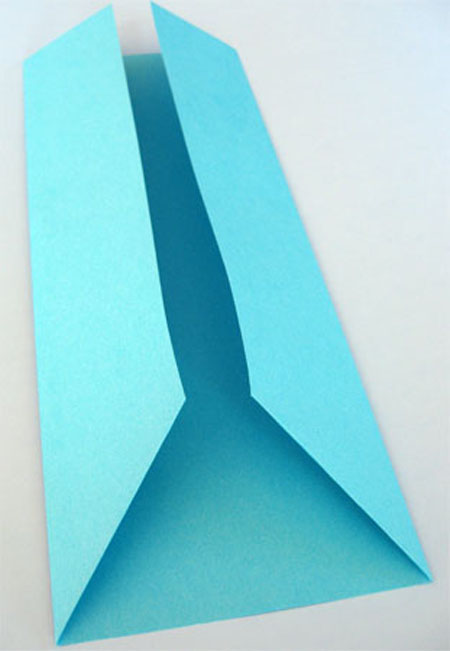
Fold bottom up (at the top of where the bottom corners were folded in). Slightly open back up the bottom fold. Fold area above the fold at an angle and push straight edge of first bottom corner folds out to form a point (it will be the shirt sleeve).
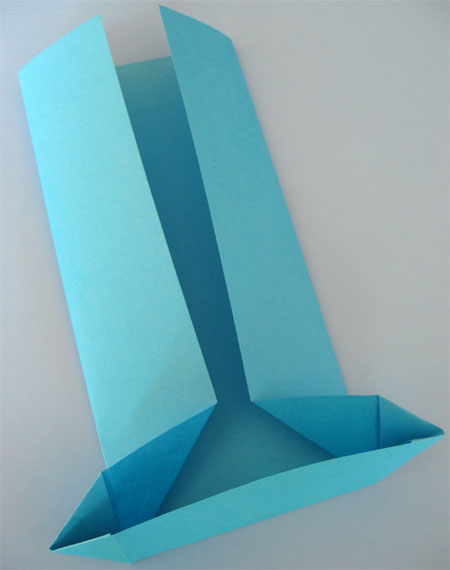
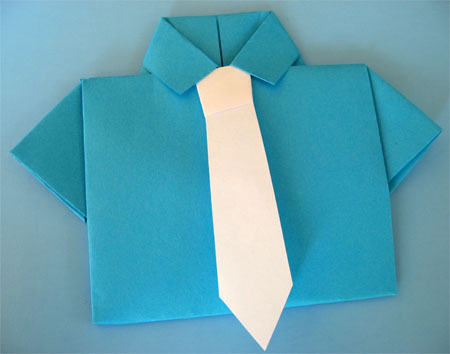
It should look like this when finished.
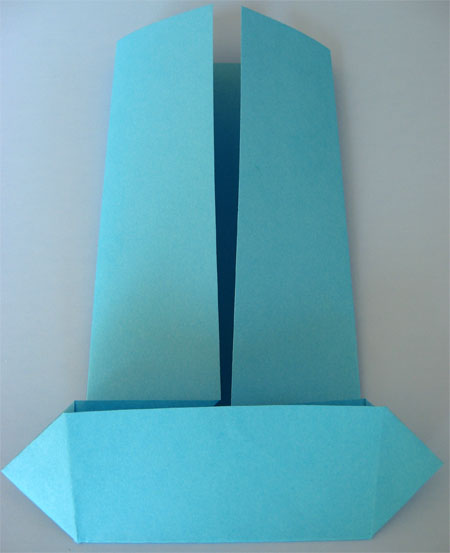
Turn paper over and fold down the top edge about 1/2"
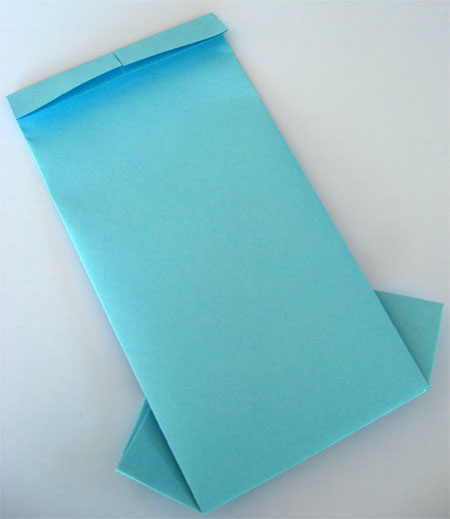
Turn card back over and fold each top corner to the center.
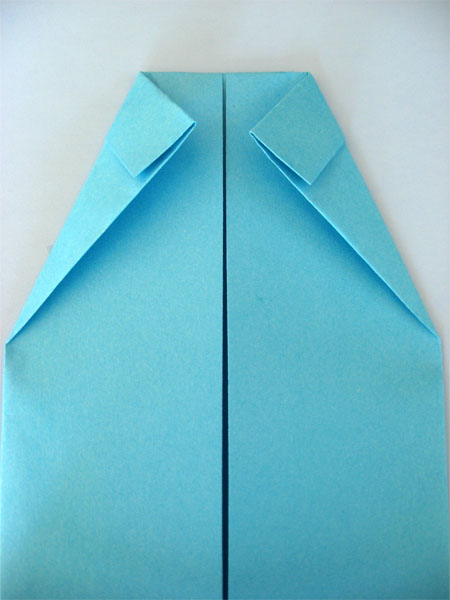
Bring bottom of paper up to the top.
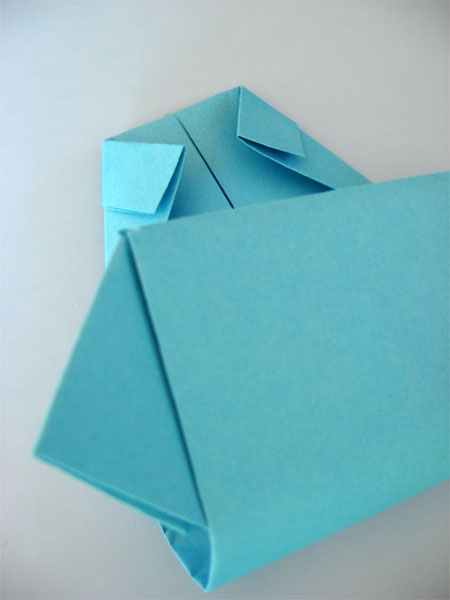
Tuck the bottom edge under the collar of the shirt and then crease the bottom.
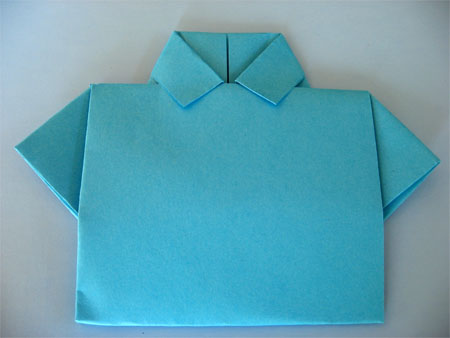
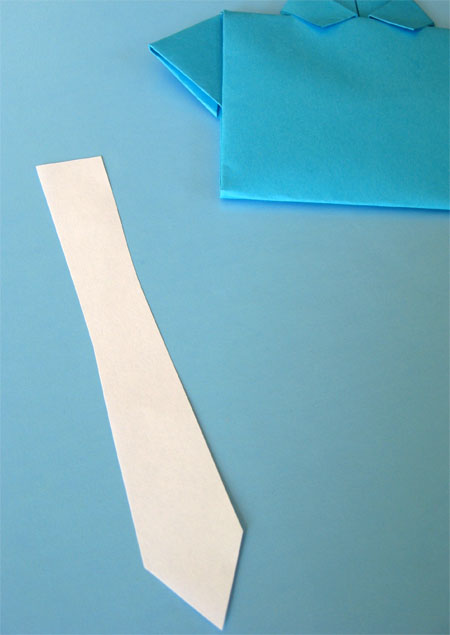
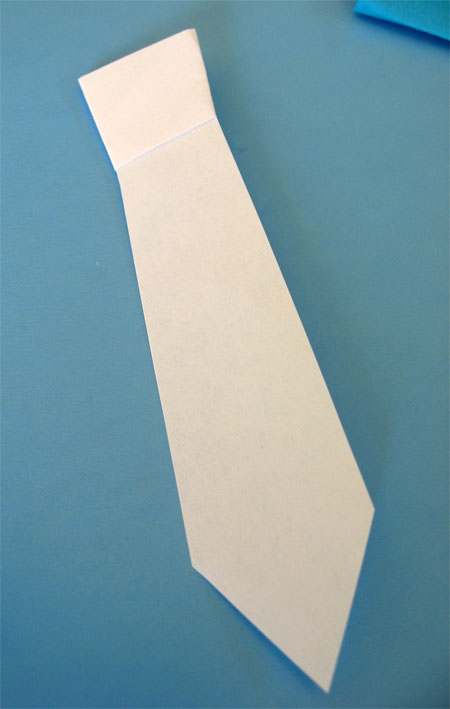
Now for the tie. Cut a tie shape about 5 3/4" long by 3/4" wide and the top to 1" wide at the bottom.
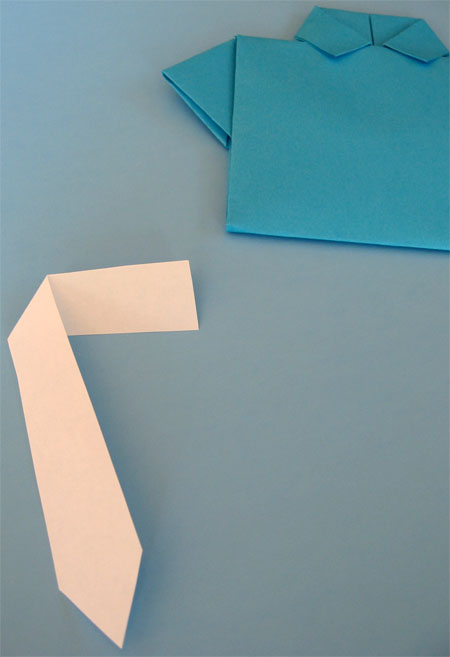
Fold top behind at an angle about 2 " from the top.
Bring the top edge over the top and across the tie.
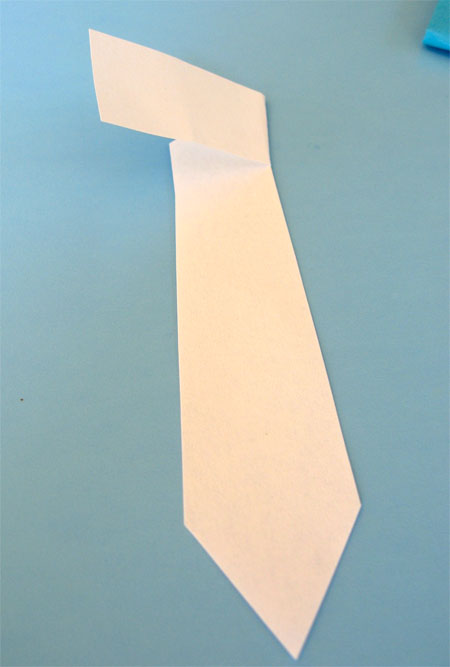
Now tuck the end behind the tie.
Glue the tie to the front of the card under the collar.
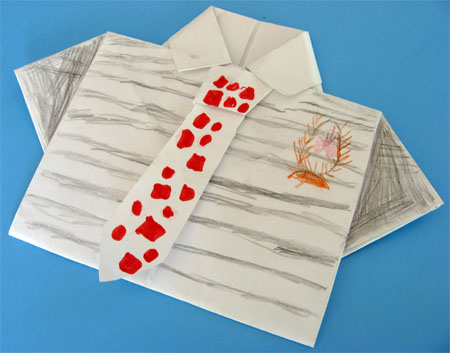
Decorate and you have an awesome card to let dad know how special he is!
Wednesday, May 20, 2009
Perpetual Birthday Calendar
Very cute idea from Nanny Goat:
I gave some for Christmas gifts and they were a big hit.


I got this idea from a scrapbook store in Utah.
It's a fun way to organize your birthdays. It's a 12 month calendar and you just write the names of your fam and friends on their month/ day and fill the envelopes with cards to pull from when their special day comes.
What you will need:
*13-9x6 vertical white envelopes
*13 sheets of 12x12 scrapbook paper (its fun if you can find paper to fit the season or holiday of that month)
*ribbon to match paper
* adhesive
*Months and days printed on cardstock
*ink/ chalk for edges (optional)
*2 book rings
INSTRUCTIONS
1. Cut out your scrapbook paper 5 1/2 in. by 8 1/2 in. and a piece to cover the flap (you may want to trace the flap and make a pattern to trace for all of your pages) Ink edges if desired and add ribbon with glue dots or staples. Glue the papers to 2 envelopes so that as you turn the pages the paper and month line up with the flap opening at the top (refer to the pics).
2. Cut out Months and glue to flap. I used a pop-up glue dot on the first letter of the month to add more dimension.
3. Cut out dates, ink, add any ribbon, and glue to paper,
4. Hole punch the bottom of envelopes (you might want to finish all of the months first and put everything in place before you punch any holes, just to be sure that it flips correctly) and add book rings.
I gave some for Christmas gifts and they were a big hit.


I got this idea from a scrapbook store in Utah.
It's a fun way to organize your birthdays. It's a 12 month calendar and you just write the names of your fam and friends on their month/ day and fill the envelopes with cards to pull from when their special day comes.
What you will need:
*13-9x6 vertical white envelopes
*13 sheets of 12x12 scrapbook paper (its fun if you can find paper to fit the season or holiday of that month)
*ribbon to match paper
* adhesive
*Months and days printed on cardstock
*ink/ chalk for edges (optional)
*2 book rings
INSTRUCTIONS
1. Cut out your scrapbook paper 5 1/2 in. by 8 1/2 in. and a piece to cover the flap (you may want to trace the flap and make a pattern to trace for all of your pages) Ink edges if desired and add ribbon with glue dots or staples. Glue the papers to 2 envelopes so that as you turn the pages the paper and month line up with the flap opening at the top (refer to the pics).
2. Cut out Months and glue to flap. I used a pop-up glue dot on the first letter of the month to add more dimension.
3. Cut out dates, ink, add any ribbon, and glue to paper,
4. Hole punch the bottom of envelopes (you might want to finish all of the months first and put everything in place before you punch any holes, just to be sure that it flips correctly) and add book rings.
Subscribe to:
Posts (Atom)


