
Showing posts with label Gift. Show all posts
Showing posts with label Gift. Show all posts
Thursday, February 10, 2011
Saturday, July 17, 2010

Thursday, April 15, 2010


Saturday, March 6, 2010

Monday, September 7, 2009

Thursday, July 30, 2009
Scallop Envelope Box

One day when I buy the scallop envelope die cut, I will make this darling box. I found it on Stampin' Pretty. She has a great tutorial on her site.
Apparently I have been doing a no-no in coping and pasting (called hot-linking)from people's blogs. I always give them credit but i guess when you copy and paste, it uses there bandwidth for you all to view their info even if it is on my site. I am a big dummy when it comes to how you are all viewing this stuff. I just know it works...somehow. So I am sorry to those of you that I have copied and pasted your info. I just really like your work. Hopefully this is the correct way to do it.
Saturday, July 25, 2009
Double Box Holder
Double Box Holder with Dawn

Here are the supplies I will be using in todays video :
Big Shot #113439
Box #2 Bigz Die #114518
Oval all stamp set #113790
Scallop oval punch#114889

To the Nines Designer paper Specialty # 114038
( you will need 1 Sheet of 12 X 12 )
Wide Oval Punch # 112082
Sticky strip #104294
Dimensionals #104430
Until later... Happy Stampin!

Monday, July 20, 2009
Recycling Baby Food Jars
I love the matching game included below from Homemade by Jill:
Baby food jars are just too cute to throw in the recycling bin. I'm using some of mine for color-coordinated button storage, but I'd like to think of more uses.
 It would be cute to fill the taller 6oz baby food jars with homemade lemon curd for holiday gifts. With a festive label and some ribbon, they would be a perfect little item to have on hand.
Oscar loves to play with the baby food jar lids. To make them a more interesting, I put some simple pictures inside. When he's older we can make it a matching game.

Would you like to play, too? Click here for the .pdf. Print two copies on cardstock or photo paper, cut out the circles, and press into the inside of (clean) baby food jar lids. It is a tight enough fit that no glue is required. For an older child, though, you could paint the lids a pretty color and glue the images to the inside for a longer lasting (and cuter) game.
Baby food jars are just too cute to throw in the recycling bin. I'm using some of mine for color-coordinated button storage, but I'd like to think of more uses.
 It would be cute to fill the taller 6oz baby food jars with homemade lemon curd for holiday gifts. With a festive label and some ribbon, they would be a perfect little item to have on hand.
Oscar loves to play with the baby food jar lids. To make them a more interesting, I put some simple pictures inside. When he's older we can make it a matching game.

Would you like to play, too? Click here for the .pdf.
 Print two copies on cardstock or photo paper, cut out the circles, and press into the inside of (clean) baby food jar lids. It is a tight enough fit that no glue is required. For an older child, though, you could paint the lids a pretty color and glue the images to the inside for a longer lasting (and cuter) game.
Thursday, July 9, 2009
Car Seat Tent
I saw this on the Thrifty Chick. I wish I had the sewing skills to make this for my new niece Charly.
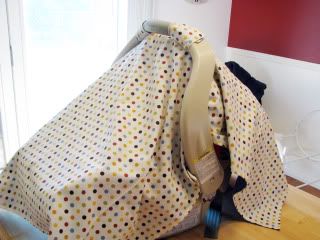
I saw one of these for the first time, a few months ago at the grocery store. It was darling! It was for a little girl and of course was embellished with bows and flowers and other girliness. I knew I was having a boy, and mine wasn't going to be anywhere near as cute, but also knew I had to go home and make one of my own!! Anyway, now that my little one is here, I whipped it together. Easy-Peasy Project, and so worth the time. In the summer it is fabulous to block out the sun and rain, and of course the winter it's perfect for keeping out snow, wind and unwanted strangers wanting to touch your little one!!

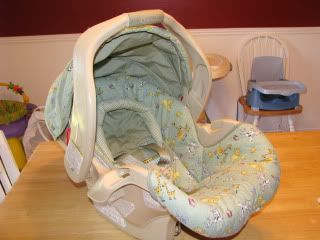
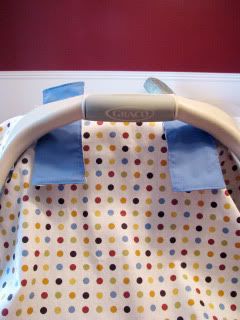
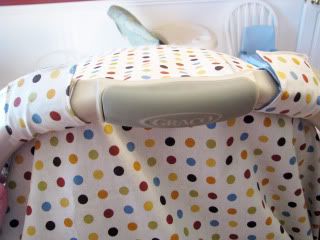
To start off you just need to figure out how long you want your tent to hang over either end. This is my car seat...

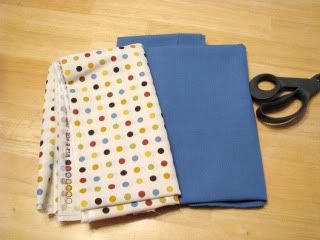
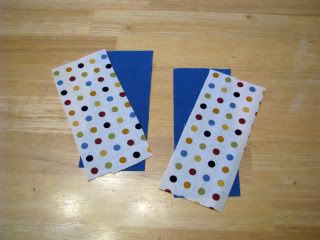
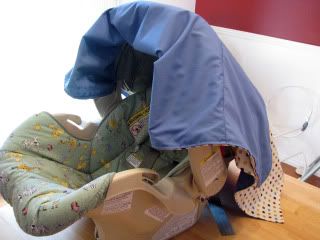
I decided to make my tent a yard and a quarter long. You need to pick 2 coordinating fabric pieces. I chose a polka dot pattern for the top, and solid blue for underneath.

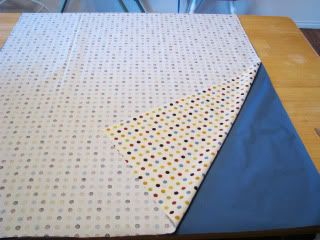
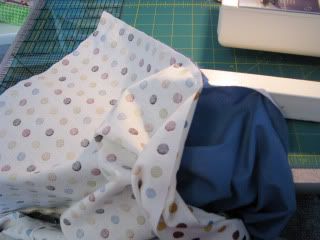
Next, cut them to the desired width. For mine I chose 31 inches wide. So it was 31 inches wide by a yard and a quarter long. Place them with there front sides facing each other and pin around the edges, leaving a small gap to be able to turn the fabric right side out when your done sewing. (Now that I'm done with mine, I almost think it would have looked better had I rounded the corners, to soften it a little bit. Now would be the time to do that if you would rather have the rounded corner look.)

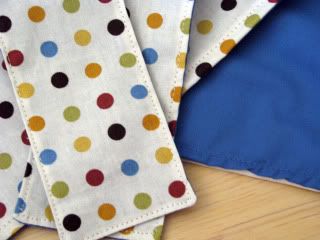
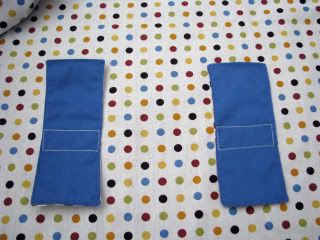
Next cut out 4 rectangular pieces for the straps to hold the tent to the seat. I cut mine 4 in. x 7 inches. You'll need 2 pieces in each fabric pattern.

Now you'll want to sew around the edge of the entire tent and straps, and then turn them right side out.

Pin the hole shut, and sew around the edge of all pieces again. This top-stitch gives it a more finished look.


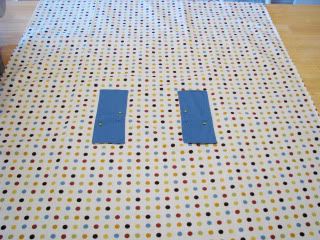
Now you'll want to take the fabric piece for the tent, and drape it over your car seat to determine where the velcro straps will need to go. Pin them in place.

After I pinned mine in place, I layed the fabric on the table and made sure the straps were even with each other. I ended up pinning mine almost right in the middle of the fabric, with each strap being 10 inches away from the edge.

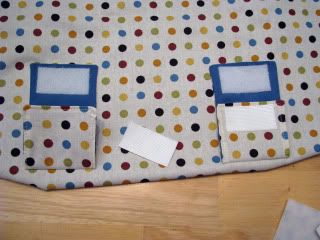
Next I sewed them to the fabric in a rectangular fashion. I felt like this would hold better, rather than just sewing them on with 1 straight stitch. I even double stitched for extra hold.

Next I added the velcro pieces. I just used the commercial grade sticky back velcro, since this tent wasn't going to be taken on and off. If I were making this as a gift or to sell I would have used the sew on velcro. Anyway, your choice.

And thats it! Now you just velcro it on. Since this is for a boy there wasn't much embellishing that could be done. I probably could have added some giant size buttons to the top of the straps or something. For a little girl you could even use ribbon in place of the straps, and just tied the tent on with bows around the handle.


I saw one of these for the first time, a few months ago at the grocery store. It was darling! It was for a little girl and of course was embellished with bows and flowers and other girliness. I knew I was having a boy, and mine wasn't going to be anywhere near as cute, but also knew I had to go home and make one of my own!! Anyway, now that my little one is here, I whipped it together. Easy-Peasy Project, and so worth the time. In the summer it is fabulous to block out the sun and rain, and of course the winter it's perfect for keeping out snow, wind and unwanted strangers wanting to touch your little one!!
To start off you just need to figure out how long you want your tent to hang over either end. This is my car seat...
I decided to make my tent a yard and a quarter long. You need to pick 2 coordinating fabric pieces. I chose a polka dot pattern for the top, and solid blue for underneath.
Next, cut them to the desired width. For mine I chose 31 inches wide. So it was 31 inches wide by a yard and a quarter long. Place them with there front sides facing each other and pin around the edges, leaving a small gap to be able to turn the fabric right side out when your done sewing. (Now that I'm done with mine, I almost think it would have looked better had I rounded the corners, to soften it a little bit. Now would be the time to do that if you would rather have the rounded corner look.)
Next cut out 4 rectangular pieces for the straps to hold the tent to the seat. I cut mine 4 in. x 7 inches. You'll need 2 pieces in each fabric pattern.
Now you'll want to sew around the edge of the entire tent and straps, and then turn them right side out.
Pin the hole shut, and sew around the edge of all pieces again. This top-stitch gives it a more finished look.
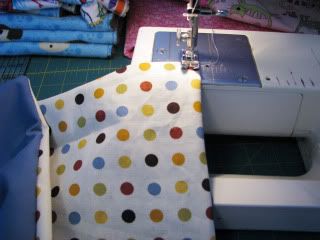
Now you'll want to take the fabric piece for the tent, and drape it over your car seat to determine where the velcro straps will need to go. Pin them in place.
After I pinned mine in place, I layed the fabric on the table and made sure the straps were even with each other. I ended up pinning mine almost right in the middle of the fabric, with each strap being 10 inches away from the edge.
Next I sewed them to the fabric in a rectangular fashion. I felt like this would hold better, rather than just sewing them on with 1 straight stitch. I even double stitched for extra hold.
Next I added the velcro pieces. I just used the commercial grade sticky back velcro, since this tent wasn't going to be taken on and off. If I were making this as a gift or to sell I would have used the sew on velcro. Anyway, your choice.
And thats it! Now you just velcro it on. Since this is for a boy there wasn't much embellishing that could be done. I probably could have added some giant size buttons to the top of the straps or something. For a little girl you could even use ribbon in place of the straps, and just tied the tent on with bows around the handle.
Tuesday, June 23, 2009
Orange Crush Gift Set
Very cute little party favors from Impressions:

Well, soft ball is officially over. Both girls loved it. Between the two of them we had 4-9 games a week plus 1 practice. We were super busy. Tony was the coach of Molly's t-ball team and the assistant coach of Sarah's softball team. It was a lot of fun. We are having a pizza party for Sarah's team tonight. They are getting their trophies tonight. They took 1st place in the league this year. Woo Hoo!! I made each of the girls a little something to congratulate them.

Bag toppers:filled with those orange slice gum drop things. Sarah's team name is Orange Crush. I printed orange crush off of the computer and stamped the orange slice in only orange and then went over the segments with orange stickles.

RSVP pens: I haven't made these in a while. I forgot how much fun they were. I know the girls will love them. I went to Wal-Mart today to get the pens and my Wal-Mart doesn't sell them anymore. I was bummed, but I found them at Staples. However, they cost more there. Boo!!!

Peppermint Sammiches: I love making these. I whipped them up in like 10 minutes today. I love how easy they are. I just finished putting all the stuff in clear goodie bags and will pass them out to the girls tonight at the pizza party.
Thanks for being patient with me in my absence. I am getting more time to stamp lately so I should be getting back on track soon. Thanks too for your e-mails. They are getting me more excited about stamping, and getting back to my blogging friends.
Stamps: Tart and Tangy
Paper: Only Orange, Whisper White
Ink: Only Orange
Accessories: Silver Brads, Orange Slice Candy, Orange Stickles, SU Scallop Punch, SU Circle Punch, Peppermint Candy, RSVP Pen, Tacky Tape Sheets, Address Labels, Micro Beads, Heat Gun
Monday, June 22, 2009
Stationary Box
 Very cute stationary box I found on Creative Itch:
I'm always on the hunt for simple, cheap, and cute craft ideas. I hit the jackpot when I stumbled on this cute stationary box!!
 When you take the lid off, it opens up to look like this. It has a place for your cards, cute little 3x3 cards, and some tags. The little notebook you see is an address book, and there's a place for stamps and a pen. Isn't it just adorable?
 Here's the cards and tags I made. There's a total of 4 of each.
Saturday, May 30, 2009
Family Yahtzee
This is a very cute idea. Family Yahtzee by The Thrifty Chick:


With Summer coming up and kids home from school, I thought I would post this fun game I made for my family a few years ago. We have a family night at our house every Monday night. Games are always a BIG hit with the kids! I decided I wanted to try and duplicate some of our favorite games, but make my versions a little more personal. The first game was Yahtzee!! It is really easy to do, but I will admit is a little time consuming (there is a lot of waiting going on in the process of making this game). But in the end it is worth it!!
Supply List:
5- wooden blocks/cubes, (These can be in any size you prefer. When I first made this game 3 years ago I used 3 x 3 paper cubes. It was fun that they were so big, but awkward to store the game) The cubes I used for this tutorial are 1 1/2" x 1 1/2" wooden cubes. I just purchased a 10 foot piece of 2 x 2 wood for $2.50 at Lowes and cut the amount of cubes I needed. (I don't know why wood is measured this way, they say the wood is 2 x 2 but the actual size is 1 1/2 x 1 1/2??) I did find these wooden cubes for a farely decent price on oriental trading If you want to buy some ready made.
Acrylic paint for the actual color of cubes you want (mine are painted in white)
1- 12 x 12 sheet of scrapbook paper in whatever pattern you choose
Mod Podge
3 sponge brushes
A container to store your finished dice/cubes in ( I just bought a small chipboard box with a lid from Michaels Craft store)
6 different pictures cut in squares
The first thing you'll want to do, regardless of where you get your wood is lightly sand all the edges so they are smooth, and then paint each entire cube with 2 layers of whatever color paint you choose. (Oh and I didn't have my box in this picture, but if you are going to store your game in a chipboard box you'll want to paint it also with 2 layers of paint at the same time)

You'll want to let them dry at least 45min to an hour, or until you know for sure they are totally dry. In the meantime you'll want to cut your patterned paper into the right size pieces to place as a background on each side of the cube. You will have 6 sides to each cube, and 5 cubes. So you will need 30 small squares of paper. How big you want them, is based upon how big your cubes are. (I cut my patterned paper into 1 1/4" x 1 1/4" pieces, so there was a quarter inch wooden boarder around each piece of paper.)

Next you'll want to spread 1 layer of mod podge onto one side of the wooden block and place a square of patterned paper over it. Making sure you rub all over on the paper pushing out any bubbles underneath it and sealing down the edges and corners. There was no rhyme or reason to what angle my patterned paper faced, it's just whatever floats your boat!! Once you have placed the paper on, you'll then want to paint a second layer of mod podge over the patterned paper, completely sealing it on. This is where the waiting begins. You'll want to do the mod podged pattern paper on all sides of the cubes. But you'll want to wait at least 5 - 10 minutes to let each side dry before placing it face down to do another side.
 If you want to add a matching patterned paper game title to your box like I did, this is when you'll do the same process as the cubes. By painting one mod podge layer, then sticking your patterned paper over it, and then painting a final mod podge layer over your patterned paper.

All of the patterned paper mod podged to the cubes and now drying...

While waiting for my cubes to dry, I spent about 25 minutes picking out what pictures I wanted to use on the cubes and printing them. You will need 6 different pictures, and then each picture duplicated 5 times. I just used my Photoshop to line up my pictures and print them all on 1 page. (My pictures were 1 inch x 1 inch squared. You can cut your pics out any size you wish for your cubes. I wanted mine to be about 1/2" less than my wood size)

While editing and cropping my photos down to size, I used my round paintbrush in photoshop to add a white dot to the corner of each pic. I then assigned a number to each pic, representing the number the pic would be on the dice(cube).

Once all the mod podged dice were totally dry...

I then added my pictures to the blocks the same way I added the patterned paper. With a layer of mod podge, then the pic smoothed down, and a sealing layer of mod podge over the pic.

Again, you'll want to let the mod podge dry for about 5-10 minutes between layers and pics. After it's all mod podged you'll want to leave it drying on a cooling rack over night. And that's it! By the next day it should be totally dry and ready to play with!!

These are some pics of my original game I made a few years ago. I made them with cardstock cubes, so they didn't hold up as well, and they were really big so they had to be stored in one of these big plastic containers.

We only had 4 family members at the time and 1 family pic, so I just used the word Family as the last side of my dice.


I printed up my own game cards to store with my game. These are totally identical to the actual games cards that come with the game of yahtzee, just in a cuter font to go with my home-made game.


A close-up pic of the final storage box the game goes into..

A close-up pic of the final dice/cubes...

Obviously you don't even have to make this a family yahtzee game. You can personalize it with any theme!! It would make a great gift to a family member who loves games!! Whatever you decide to do, hopefully you will have as many fun hours enjoying your game as we have!!
P.S. So I was thinking that giveaways on blogs are just too stinken fun to not do them on a regular basis. I was thinking of my next giveaway to actually be one of these personalized Yahtzee games. Where the winner just emails me there 6 pics they want on the cubes and I make them a game? Is it cheezy? Or if I did this as a giveaway in a few days you would totally be interested??


With Summer coming up and kids home from school, I thought I would post this fun game I made for my family a few years ago. We have a family night at our house every Monday night. Games are always a BIG hit with the kids! I decided I wanted to try and duplicate some of our favorite games, but make my versions a little more personal. The first game was Yahtzee!! It is really easy to do, but I will admit is a little time consuming (there is a lot of waiting going on in the process of making this game). But in the end it is worth it!!
Supply List:
5- wooden blocks/cubes, (These can be in any size you prefer. When I first made this game 3 years ago I used 3 x 3 paper cubes. It was fun that they were so big, but awkward to store the game) The cubes I used for this tutorial are 1 1/2" x 1 1/2" wooden cubes. I just purchased a 10 foot piece of 2 x 2 wood for $2.50 at Lowes and cut the amount of cubes I needed. (I don't know why wood is measured this way, they say the wood is 2 x 2 but the actual size is 1 1/2 x 1 1/2??) I did find these wooden cubes for a farely decent price on oriental trading If you want to buy some ready made.
Acrylic paint for the actual color of cubes you want (mine are painted in white)
1- 12 x 12 sheet of scrapbook paper in whatever pattern you choose
Mod Podge
3 sponge brushes
A container to store your finished dice/cubes in ( I just bought a small chipboard box with a lid from Michaels Craft store)
6 different pictures cut in squares
The first thing you'll want to do, regardless of where you get your wood is lightly sand all the edges so they are smooth, and then paint each entire cube with 2 layers of whatever color paint you choose. (Oh and I didn't have my box in this picture, but if you are going to store your game in a chipboard box you'll want to paint it also with 2 layers of paint at the same time)

You'll want to let them dry at least 45min to an hour, or until you know for sure they are totally dry. In the meantime you'll want to cut your patterned paper into the right size pieces to place as a background on each side of the cube. You will have 6 sides to each cube, and 5 cubes. So you will need 30 small squares of paper. How big you want them, is based upon how big your cubes are. (I cut my patterned paper into 1 1/4" x 1 1/4" pieces, so there was a quarter inch wooden boarder around each piece of paper.)

Next you'll want to spread 1 layer of mod podge onto one side of the wooden block and place a square of patterned paper over it. Making sure you rub all over on the paper pushing out any bubbles underneath it and sealing down the edges and corners. There was no rhyme or reason to what angle my patterned paper faced, it's just whatever floats your boat!! Once you have placed the paper on, you'll then want to paint a second layer of mod podge over the patterned paper, completely sealing it on. This is where the waiting begins. You'll want to do the mod podged pattern paper on all sides of the cubes. But you'll want to wait at least 5 - 10 minutes to let each side dry before placing it face down to do another side.
 If you want to add a matching patterned paper game title to your box like I did, this is when you'll do the same process as the cubes. By painting one mod podge layer, then sticking your patterned paper over it, and then painting a final mod podge layer over your patterned paper.
All of the patterned paper mod podged to the cubes and now drying...

While waiting for my cubes to dry, I spent about 25 minutes picking out what pictures I wanted to use on the cubes and printing them. You will need 6 different pictures, and then each picture duplicated 5 times. I just used my Photoshop to line up my pictures and print them all on 1 page. (My pictures were 1 inch x 1 inch squared. You can cut your pics out any size you wish for your cubes. I wanted mine to be about 1/2" less than my wood size)

While editing and cropping my photos down to size, I used my round paintbrush in photoshop to add a white dot to the corner of each pic. I then assigned a number to each pic, representing the number the pic would be on the dice(cube).

Once all the mod podged dice were totally dry...

I then added my pictures to the blocks the same way I added the patterned paper. With a layer of mod podge, then the pic smoothed down, and a sealing layer of mod podge over the pic.

Again, you'll want to let the mod podge dry for about 5-10 minutes between layers and pics. After it's all mod podged you'll want to leave it drying on a cooling rack over night. And that's it! By the next day it should be totally dry and ready to play with!!

These are some pics of my original game I made a few years ago. I made them with cardstock cubes, so they didn't hold up as well, and they were really big so they had to be stored in one of these big plastic containers.

We only had 4 family members at the time and 1 family pic, so I just used the word Family as the last side of my dice.


I printed up my own game cards to store with my game. These are totally identical to the actual games cards that come with the game of yahtzee, just in a cuter font to go with my home-made game.


A close-up pic of the final storage box the game goes into..

A close-up pic of the final dice/cubes...

Obviously you don't even have to make this a family yahtzee game. You can personalize it with any theme!! It would make a great gift to a family member who loves games!! Whatever you decide to do, hopefully you will have as many fun hours enjoying your game as we have!!
P.S. So I was thinking that giveaways on blogs are just too stinken fun to not do them on a regular basis. I was thinking of my next giveaway to actually be one of these personalized Yahtzee games. Where the winner just emails me there 6 pics they want on the cubes and I make them a game? Is it cheezy? Or if I did this as a giveaway in a few days you would totally be interested??
Subscribe to:
Posts (Atom)


