Showing posts with label Organization. Show all posts

Saturday, March 26, 2011

Vinyl Board

I love this idea from Super Saturday Crafts
When I make mine, I think I will put the days of the week in the menu section:

Saturday, September 12, 2009

Holiday Planner

Look How cute this idea is from Mish Mash! I love it! Another cute version is over at The Creative Itch.


Tuesday, July 28, 2009

Summer Tips

More great ideas from Parent Hacks. This time it is Summer Tips:


While my search-and-browse system isn't the best (for now! for now!), you can find lots of great hacks to keep your summer going smoothly. Here are a few to get you started. And don't forget the piles of family travel tips in the Travel/Going Out archive, including our series of family camping tips.

Instant s'mores

Clean summer toenails with a toothbrush

Tape combination to padlock so it won't be forgotten over the summer

Fill baby's high chair tray with water for warm weather splashing

Coffee sleeve makes frozen drinks easier to handle

Washing the water table is almost as fun as playing with it

Bath toys gain new life as pool toys

Old-fashioned ice crusher makes a perfect hot weather distraction

Frozen yogurt tubes stand in for ice cream treats

Baby food stains come clean in a sunbath

Put toddler girls into boys' swim trunks for extra sun and knee protection

Turn the Pack n' Play into a shady hangout for baby

Talk amongst yourselves: favorite sunscreen? (This conversation could use some updating as sunscreens have changed so much in recent years -- click through and comment!)

Apply sunscreen to kids' faces with a makeup brush

Sunscreen as face paint

Nightlight on a timer tells early risers when it's morning wakeup time

Financial Planning

Here are some great tips from Parent Hacks. I know this one seems boring but it is something we have been thinking about and trying to complete. We just finished getting life insurance. Now we need to do our will:


Last weekend, there was a sudden death in my extended family. He was young, he was healthy, he was the father of two.

As I sit with my family marveling at how instantly life can change, I'm also watching one of my dearest relatives struggle with the financial realities of this terrible event. We always say we'll plan for the eventualities...we'll get the will together, we'll make sure the life insurance is up-to-date, we'll pay attention to where our money's going, we'll clean up the filing cabinet...but life tends to get in the way. The urgent pulls our attention away from the important. We get busy. Usually, it all works out.

But sometimes it doesn't.

My cousin's friend, a retired financial planner and stock broker, is helping her through this by tackling the unopened statements and unanswered questions and hopefully making sense of it all. In the process, we've been talking about simple preventative measures everyone should take to avoid such a mess themselves.

Share the responsibility for financial matters. The simplest, most important thing you can do is to talk to each other about your money. If one person is responsible for the bill paying and record keeping (or the insurance levels, or the investment plans, etc.), imagine what would happen if that person suddenly went away?

Sit down together (possibly with a glass of wine) and talk about where you are financially and where you want to go. Each of you should have a sense of how much is in the various accounts, how much you pay for utilities, and how much you owe on your credit cards. If necessary, hire a financial planner to help you have these conversations. Things sometimes go more smoothly while sitting a nice office in the presence of a objective party.

Put recurring payments on autopay. There is no reason to ever forget an insurance or mortgage payment. Set up automatic payment of those bills, either via direct withdrawal from your bank, or through autopay via your online banking system. Last resort: pay your bills automatically using your credit card. If cash flow is an issue (you're not sure if you have enough in your account every month to pay all of the bills), at least put your life, disability, and car insurance on autopay. The consequences of letting them lapse are dire.

Buy life insurance. Everyone with a family needs life insurance. Term life insurance is CHEAP. Get some and put it on autopay. Your financial planner will help you with amounts. If the main breadwinner were to die, the surviving family would rest a lot easier knowing the house/the debt/college/whatever were paid off. If the person responsible for most of the child care were to die, the surviving family could pay for good-quality day care and (if necessary) housekeeping and gardening help. If breadwinning and child care are shared, life insurance makes sure that a death in the family doesn't also mean a massive shift in lifestyle.

Get a will. Everyone needs one. Pay a lawyer or a paralegal a few hundred bucks to do it for you, or use software such as Nolo Press Willmaker. Get it done now.

Co-sign on the safe deposit box so each spouse can access it. If you've been putting off this 10-minute job, do it on Monday. Consider putting a third trusted signer on the list in case you both die at the same time.

Consolidate your financial records. Spend 15 minutes a day cleaning up your file system. Create a master list of contact and account numbers so anyone can have it all at their fingertips. The master list should contain:

  • Account numbers for all bank accounts, investment accounts, and retirement accounts.
  • Account numbers for all credit cards and loans.
  • Account numbers for all insurance policies.
  • Contact information for all financial and legal advisors.
  • Contact information for each person's workplace benefits department.
  • Social security numbers for everyone in the family.
  • Location of the safe deposit box.
  • Passwords, maiden names, mailing addresses and other secret keys to accessing information about these accounts on the phone or online.

Keep copies of this list in sealed envelopes in the safe deposit box, in a locked file, and with a trusted family member (ideally the executor of your will), and update it as details change. Be careful to keep this list accessible but secure -- it's a crib sheet for identity theft.

Update beneficiary information. Whenever there is a birth or death in your family, update the beneficiary information on your accounts and investments. If you have a will or trust, check with your lawyer; in some cases, the primary or contingent beneficiary should be "estate."

Don't put off the conversation. If there's anything this last week has shown me, it's that everything can change instantly. Set aside time this week to get started on these steps, whether with your spouse, your parents, or on your own.

By the way, we're talking about the death of a spouse, but this list works just as well for the loss of a job or any other sudden life change. It takes much less than a death to knock you off your rational feet for a while, and knowing the money matters are squared away removes an incredible amount of stress.
Have I missed anything? Any other financial housekeeping suggestions to offer? I know this stuff can be uncomfortable, but once it's done, it's done. You owe yourself and your family that peace of mind.

Saturday, May 30, 2009

Ribbon Storage

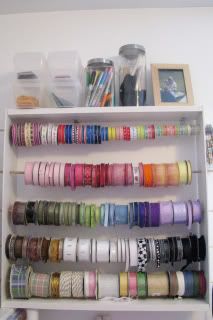
I really need to organize my ribbon somehow. When I have my own house, I think this is a great idea by The Thrifty Chick:

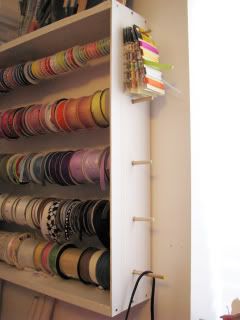
So I made this ribbon storage" thingy" :) a couple of months ago, but my sister saw it and wanted to duplicate it, so I have been asked to put up pics of it! So here ya go! It was extremely easy. I am one of those lucky ones who have a "craft" room, and in my craft room I like to be able to SEE what I have, and I also like useing my stuff as part of my decor. I am all about bright colors, and especially organization. So I have a ton of ribbon that is used for all my hobbies (scrapbooking, sewing, decor, making bows for my girlies hair, etc.) and I wanted to be able to see what I had at all times. So I used some old wood from a past project, a piece of 1x4 wood, cut into 2- 2 foot pieces, and some leftover beadboard. The beadboard was cut into 2, 4 x 2 1/2 foot pieces. Then I just nailed them to each end to make the sides. I used my drill gun to drill the small holes on each side (which I did before I nailed them on) to put my dowels through, and voila! It was really simple, and even better"cheap" (all I had to buy were the dowels). If you want to duplicate it and need better instructions leave me a comment and I'll try to do a better job at explaining!

So I was looking at the sides of this and wondering why I didn't finesse my job by adding cute wooden knobs to the end. And then i realized why I didn't. If I had glued cute wooden knobs to the end I couldn't have pulled my dowel out when a spool of ribbon ran out and needed to be replaced! So that's why it just has the bare dowel ends poking out. Plus as you can see I hang yet more ribbon on them also!!

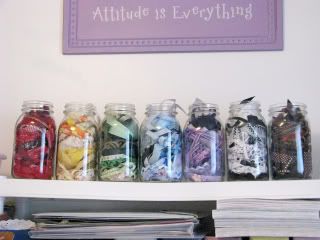
And this is how I store all my loose ribbon. In empty bottling jars!
So anyway, there ya go, my home-made ribbon storage thingy!!

Wednesday, April 15, 2009

Ribbon Scrap Jar

Ribbon Jar from An Altered State of Mind:

This next project was a little funky - it's a ribbon jar to hold ribbon scraps. I punched holes in the lid and decorated the front of the jar. I used Zoe Pern's Fun For Me kit. I LOVE this kit - I love all of Zoe's designs!!!

Thursday, April 2, 2009

Ribbon Storage Box Tutorial

Look at this brilliant idea for a ribbon storage from jmday:


Ever since I made the first ribbon storage box to mimic this box from Oriental Trading, I’ve been thinking about how hard I looked for a good tutorial on the subject. I can’t promise that my tutorial will be “good”, but I’ll show you what I did.

ribbons1.jpg

The first big problem is to find a good sturdy box that will accomodate a good number of ribbon spools I ended

up buying two of these (plus a smaller version of the same box) from IKEA. The great thing about them is that they are sold in packages of two, and they require assembly. Yep, you heard me right, I *LIKE* - in this case - that they weren’t complete on shipment. Here’s why:

ribbons2.jpg Because they are shipped flat, it’s much easier to mark the holes and insert the eyelets. But don’t let that discourage you. Any sturdy cardboard box would work.ribbons4.jpg

The first step is, then to mark where you want the holes. I found that because I could put two rows of ribbon in the box, that I wanted lots of holes to poke it through. So I created this layout. 5 large eyelets on the bottom row, and 8 smaller ones on the top. I just drew two horizontal lines where I wanted each row to be and then evenly spaced each hole. (On this go round, I just opened the box I had completed already and traced the holes locations.)

ribbons5.jpg During my first attempt, I cut each hole by hand with an Exacto knife. That proved to be really hard as this is some seriously thick cardboard. So this time around, I asked my hubster to try using the drill. Ahhh… I saved the aching in my hands and ended up with much cleaner holes! Each hole he drilled was just a tiny bit bigger than the opening in the eyelet.

ribbons6.jpg Next, just insert the eyelets. The large and small follow a similar process, but follow the instructions on your eyelet kits.

ribbons7.jpg And voila! Your own neat ribbon storage! You can see that even with the extra holes I still needed to thread 2 ribbons through some. So far, that seems to be working ok. And it’s really easy to see what I have, and actually USE it because it’s easy to get to.

Now, does anyone know what to do with the little “bobbins of ribbon”? I have a million of those too!!!

Thursday, February 19, 2009

Grocery Bag Organizer

Found this on Creatively Domestic:

Grocery Bag Organizer
I finally kicked the fever-induced fog and returned the house to a non-sick-emergency state. My husband has been a huge trooper through all my whining! So now back to blogging!!!

Since January is the kickoff month to getting organized, I thought I'd share my own take on organizing all those grocery bags that come into our homes. I bring my own reusable bags to the store, but once a month, I get groceries with the plastic bags for use in our home for garbage bags. To keep them all in one place and to add a little "color" to my life, I use clean empty disinfectant wipe containers and give them a make-over! Here are the bottles with the labels removed:


Then I wrapped them in scrapbook paper, (I may hate to scrapbook, but I love love love scrapbook paper!) and stuffed in the grocery bags:


The things I love about these:
  1. It gives my all sorts of the "Save the Earth" goosebumps! Reusing the bags and reusing the wipe container - double whammy!
  2. The bags are no longer stuffed into another plastic bag, then stuffed into the cabinet, then the pile always seems to grow until I open the cabinet and out fall 40 gagillion bags. Imagine: timber!
  3. I can take one of these containers, throw it in the car in the morning of one of our roadtrips (or any regular Saturday expedition) and we have lots of empty bags for whatever kid emergency pops up throughout our adventures.

Wednesday, February 18, 2009

Menu Planning Form

Meal Planning from The Project Girl:

Here is a menu planning form that I use when I’m planning out my menu for the week. The top half has a weekly calender with space for Breakfast, Lunch, & Dinner Menus. It also has space at the bottom to list all the ingredients that you need to get at the store. A pretty simple and straightforward menu planner that also looks great on your fridge or magnet board!

meal-planner

Download this file and enjoy (for personal use only). Please tell your friends to come visit the site and download their own file. I would love a comment if you do download!

I also have a slightly different version of the form that does not have the meals for each day broken up.

mealplanner22

Download this file and enjoy (for personal use only). Please tell your friends to come visit the site and download their own file. I would love a comment if you do download!

Each of these files are a 8.5″x11″ PDF. Use Acrobat Reader to open the file and print as many as you like! Happy Menu Planning!!

Tuesday, February 10, 2009

Pantry Organizer

Found this at It's all in my head:

I have been on a bit of an organizing kick lately.. I bought this Canvas shoe organizer at Home Depot for 10 dollars to put all the little packets of food that always gets lost on the back shelves..It really works great! I had seen this idea somewhere years ago and for some reason I decided I needed one now.

Organized Craft Room

Wow! This is impressive:

Shot 9

Shot 1 info

There is another one here


Organizing Shopping

Creative Organizing Blog

Img_4571_copy


Grocery List
Clip Board

Monday, February 9, 2009

Craft Room ideas

One day when I have time & MONEY & a Craft room!

here's a collection of amazing
work spaces/craft rooms posted on 30 days:

1. indie vintage craft room, 2. North East Corner, Ribbon Rack, Tools, Desk, 3. My awesome work/storage unit from IKEA, 4. New studio redo, 5. reorganized, 6. ribbon rack, 7. Pink Cabinet - Drawers, 8. our family art corner, 9. sewingcleanup1, 10. My sewing room, 11. banner swap 1, 12. The rest of the fabric stash after re-org.
P.s. If you don't have a space for a craft room or office,
no worries, there are lots of ideas out there
to work with what ya got.
And a little paint can work magic.
Check out this link from Domino for the
perfect paint choice.

Clipboard Bulletin Board

A cute idea of how to organize my office and still make it cute from poppytalk

marthaMost of you who subscribe to Martha Stewart Living or picked up their September issue, have likely seen this "good thing", but we couldn't resist bringing it here. Using decorative paper or wallpaper, they covered the clipboards by creating a template first, then cutting with a craft knife and brushing a thin layer of decoupage glue onto the clipboard. It's just so clever and such an easy and affordable way to create a unique bulletin/inspiration board.

Organize Kids Clothes

I LOVE
this idea too.) from Amy from Living Locurto

Organization Links

Mique at 30 days gives these organization links:

As is usually the case, after I did my post
at Tip Junkie there were more
organizing posts that I loved.
Here are a few add ins:

Eddie Ross' a place for everything post
and interview with Simply Seleta
The Children's Nest kids organization
Chronicles of a Mommy's Organization Anyone? post
Stephmodo's Clutter-Control Wisdom of Ages
Country Living's Small Space Decorating (great for organization)

More Meal Planning Tips

Little Miss Crafty Pants has this to say about Grocery Lists:
I found a free website that helps with the grocery list. It is called Grocery Wiz and you can find it HERE. It also has coupons that you can print out that might apply to what you are buying. I also use a print out similar to THIS to write down my menu.

Mique at 30 days gives these sites and suggestions:

At For church I am in charge of planning activities for the women and next week we are having a menu planning, couponing & food storage activity at my house.
I've been into menu planning & couponing in the past but not food storage (though I am vowing to change). Anyway- it has been on my mind A LOT.
So- I'm posting here some of my favorite sites/blogs/resources. Who couldn't use some ideas on how to pinch pennies these days? If nothing else, save your pennies so you can buy more stuff to craft with (just a thought :).
Just great blogs in general:

Grace Violet's cash system fabric wallet


Couponing:
Couponing for Dummies from my personal blog
Coupon Binder from Thrifty & Chic Mom
Junie Moon's organizing coupon post
Tip Nut's making a coupon organizer post
Joann's market bag & coupon holder
Grocery shopping coupon worksheet from Coupon Council

Menu Planning:

Monthly menu planner from Rachel @ Apron Girls
Just Organize Yourself's menu planning tips
$5 dinners' monthly menu plan post
Living Locurto's Menu Planning post
OrgJunkie's Menu Plan Monday

Organized Home's free menu planning printouts

I heart food 4 thought's diy weekly menu board

And I made some printouts too.
Feel free to use them.
Right click and save them.
Then print how you wish.


Food Storage:
wow these are sooo great-
Everyday Food Storage
Food Storage Made Easy
the Fun Food Storage Network
My Food Storage Deals


After looking over this post I realize it's probably a bit overwhelming. Just start small but go for it!!
I'd love to hear other suggestions/tips/tutorials that are out there. Please share. ;)

JOY...Just Organize Yourself!

Wouldn't it be nice to be organized?

http://justorganizeyourself.blogspot.com/

Meal Planning Ideas

This idea is because I have to teach a class on Meal Planning at Enrichment next month. This idea comes from Apron Girls:

I have been meaning to post this FOREVER!!! I just have been out and about and on vacation--and I just realized I hadn't done anything with this. So, apologies go out to you all...this is in response to the request for a way to cut down on grocery budget, plan meals effectively and frugaly.

What is it? 3 1/2 business card holders taped together at the top and bottom. All you do is write your main dish on the blank business card, and on the BACK you write ONLY the ingredients you need for that dish. Mine looks worse for wear right now, and I have a set of new card holders waiting for me when I get back...plus a million new recipes to add to cards.

I LOVE this method--you can essentially plan your month out based on items you ALREADY have, but rearrange the meals according to the sales at your grocery store. This way, you also are eating 28 different meals each month! So, you could start your month just putting in the meals you want to eat, and when you see chicken go on sale, put a chicken dish or 2 that week to take advantage of the sale...I am sure you get the idea. Also, a really effective way to shop is to go on Tuesday night. That way you can compare the sales from one week with the ones from the next because the new ads come OUT Tuesday and start on Wednesday...SO all of you living in the boondocks can still save money too!! (that is unless your store doesn't HAVE sales...which would be a cryin' shame!)

I personally like to shop for 2 weeks at a time, at least for non-perishables. Then I fill the rest in with the sales and coupons as the time comes up to eat that meal. Then you KNOW you have what you need, it is easy to get out ahead of time, and you're not sitting there at 4:35 p.m. wondering what on earth you are going to make...

When I make my grocery list, I just do a tally of things as I go...example, cheese...this recipe uses 1 pound, that one uses 2 cups, etc. and then write the total needed. It's pretty easy.
I loved it so much I even did a whole menu for BREAKFAST! We ate SO much better this way--not depending on cereal EVERY day...we still eat it, yes. But it is nice to have warm meals thrown in there.
Sorry for the nastiness of my pics...It wasn't until I took the pics that I realized how dirty it was! Yuck!!
ALSO, Meals ONLY make it to the card holder menu planner when we LOVE THEM. I like to throw a card in every week or so that says "try a new recipe"...but I only make a specific card once it's been family approved. I also put all the recipes that go to the ingredient organizer in a cookbook (mine is a photo album because I loved having my cards protected and seeing through the back side.) So, I don't have to hunt for the recipe instructions come dinner time. They are all in one place. But I still have a stash of cookbooks I love to look through for fun and inspiration... :)