Thursday, July 9, 2009

Car Seat Tent

I saw this on the Thrifty Chick. I wish I had the sewing skills to make this for my new niece Charly.

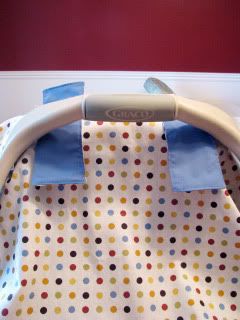
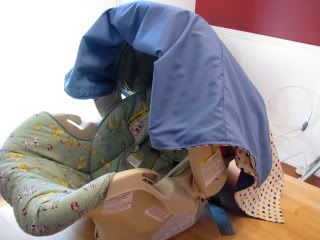
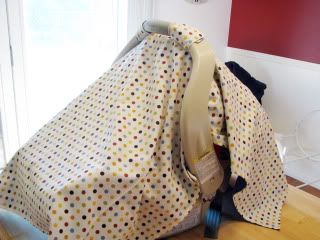
I saw one of these for the first time, a few months ago at the grocery store. It was darling! It was for a little girl and of course was embellished with bows and flowers and other girliness. I knew I was having a boy, and mine wasn't going to be anywhere near as cute, but also knew I had to go home and make one of my own!! Anyway, now that my little one is here, I whipped it together. Easy-Peasy Project, and so worth the time. In the summer it is fabulous to block out the sun and rain, and of course the winter it's perfect for keeping out snow, wind and unwanted strangers wanting to touch your little one!!

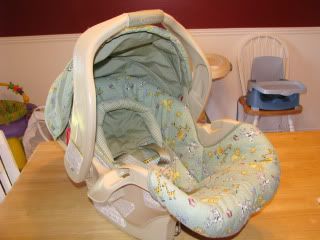
To start off you just need to figure out how long you want your tent to hang over either end. This is my car seat...

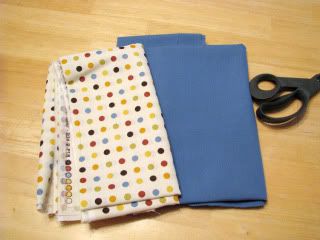
I decided to make my tent a yard and a quarter long. You need to pick 2 coordinating fabric pieces. I chose a polka dot pattern for the top, and solid blue for underneath.

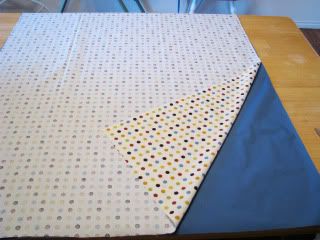
Next, cut them to the desired width. For mine I chose 31 inches wide. So it was 31 inches wide by a yard and a quarter long. Place them with there front sides facing each other and pin around the edges, leaving a small gap to be able to turn the fabric right side out when your done sewing. (Now that I'm done with mine, I almost think it would have looked better had I rounded the corners, to soften it a little bit. Now would be the time to do that if you would rather have the rounded corner look.)

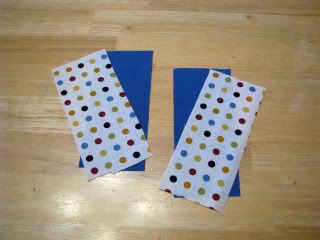
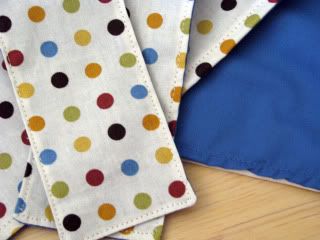
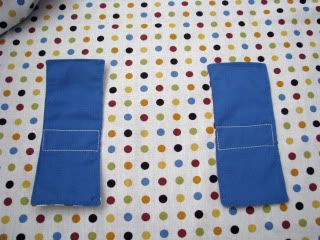
Next cut out 4 rectangular pieces for the straps to hold the tent to the seat. I cut mine 4 in. x 7 inches. You'll need 2 pieces in each fabric pattern.

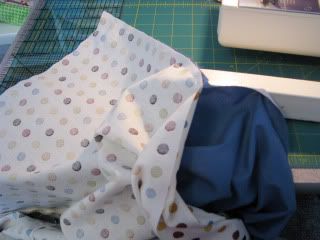
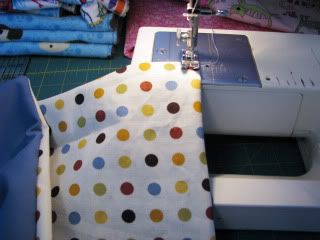
Now you'll want to sew around the edge of the entire tent and straps, and then turn them right side out.

Pin the hole shut, and sew around the edge of all pieces again. This top-stitch gives it a more finished look.


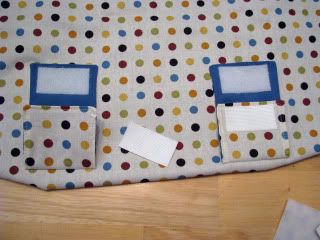
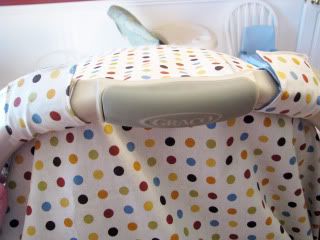
Now you'll want to take the fabric piece for the tent, and drape it over your car seat to determine where the velcro straps will need to go. Pin them in place.

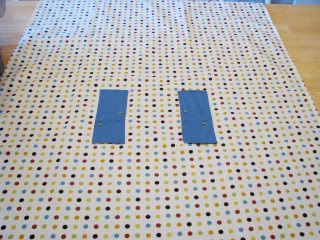
After I pinned mine in place, I layed the fabric on the table and made sure the straps were even with each other. I ended up pinning mine almost right in the middle of the fabric, with each strap being 10 inches away from the edge.

Next I sewed them to the fabric in a rectangular fashion. I felt like this would hold better, rather than just sewing them on with 1 straight stitch. I even double stitched for extra hold.

Next I added the velcro pieces. I just used the commercial grade sticky back velcro, since this tent wasn't going to be taken on and off. If I were making this as a gift or to sell I would have used the sew on velcro. Anyway, your choice.

And thats it! Now you just velcro it on. Since this is for a boy there wasn't much embellishing that could be done. I probably could have added some giant size buttons to the top of the straps or something. For a little girl you could even use ribbon in place of the straps, and just tied the tent on with bows around the handle.


Sunday, July 5, 2009

Start-Studded Mini Pies

These are a cute idea you can use next year from Our Best Bites:

I had a total disaster while making something I had planned for today. You don't think Kate and I have disasters? Oh, we do. You're going to hear about mine around Christmas time (when I post the blue food that magically turned green when I cooked it against everything I tried to prevent it! ) So I realized I was going to have to scrap it and come up with something else and I was pounding my brain trying to think of something new and different. I started thinking about pie, but didn't want to make a pie because everyone makes pie. Then I thought about mini-pies, because miniature versions are always cool. Then I thought about a darling little sugar-coated cookie-ish topper that would make these things the coolest thing on the party table. Perfect. Adorable. Delicious. And pretty darn easy too since you can use store bought dough and canned pie filling. You can certainly substitute homemade filling, but I love the bright artificial color of the canned stuff :) Plus, it's easy. I like easy.

Star-Studded Mini Pies

Pie Crust Dough (or buy refrigerated ones in a pinch)
canned pie filling (something red and something blue)
2 T butter, melted
1/4 c granulated sugar

Preheat oven according to pie crust recipe.

Roll out your pie crust so it's about this thick:


Don't ask me how thick that is, I don't know. I have fat fingers if that helps you gauge it from the picture. If you're using a store-bought crust 1) Don't tell Kate, she'll TP your house in disgust. 2) Don't buy generic (especially Walmart brand) and 3) Roll it out about 2 inches larger than it comes and you should be about right.

Using a cookie cutter, or a cup with about a 3 1/2 inch diameter, cut out circles of dough.


Place each dough circle center in one of the mini-muffin tin wells. The edge should over-hang a little. Gently roll the edge down with your fingers and then crimp it so it looks pretty.


They really don't have to be perfect, I like that these little guys look rustic and homemade in the end.


Using a spoon, (I don't know what else you'd use...) fill each mini pie a little over half full with filling. Don't go crazy and fill them to the top. Catastrophic things happen. More on that to come.


Next you'll need your cute little stars. My star cutter is about 2" across and it was the perfect size. If you can't find a cookie cutter you could always print out a stencil and cut the stars with a knife. You'd have to want these pretty bad though to go through that effort. Look through your kid's playdough bin. That's where I found mine!


Now the fun part. Dip your stars (both sides) in butter and then dredge in the sugar. Make sure to lick your fingers after the sugar starts piling up and making buttery sugar globs on your hands. Curse because you just finished working out and canceled it out with one lick. Wash hands and repeat.

Place a star on top of each little pie. It's okay if it sinks down, it will puff up when it bakes.


Pop them in the oven and bake 15-20 minutes or until the edges are golden brown. Remember when I told you not to fill them too full? This is what happens. Just so you know.


I filled the next batch only about 1/2-3/4 full and they still spilled over a bit, but I thought it was a perfect amount. I love how they spill out and look a little messy. It makes me want to just gobble them all up. And I love how festive they look with the red and blue.


You can serve them warm or at room temp. And they can definitely be made hours ahead of time.


darling, right?


2 pie crusts should be plenty to do 24 mini-pies. Depending on the recipe or brand of crust you use, you may be able to get closer to 30.

You'll definitely have left-over pie filling- make these if you need more treats (and really now, who doesn't need more treats?)

And if you're not into berries, try one of these ideas:
gooey cookie filling
quiche filling for breakfast or brunch
use shredded apples in this apple pie filling
Bake the shells and stars separately and fill with Kate's banana cream pie filling

Saturday, July 4, 2009

Happy 4th of July Bakerella Style!

I loved this post from Bakerella. I am proud to be an American! My husband became a US citizen this year. It is his first 4th of July as an American citizen. Thank you to all of you men and women who are fighting, and have fought, for our freedom!
And now for Bakerella's thoughts:


Freedom, independence & a marine named Carlos. Last week I was trying to decide what kind of Fourth of July sweets to make or if I was even going to make anything at all. Then I received an email from a reader's boyfriend and I knew I wanted to… had to… do something for the holiday.

Here's his letter. And by the way, I couldn't make anything sweeter than this.

Hi there Bakerella!

My name is Carlos and I'm a United States Marine, and have been one since 1998. If you wouldn't mind just giving my e-mail some thought, I'd be grateful. Here's the story:

My girlfriend just went away to Marine Corps bootcamp not yet a month ago. She LOVES to bake, but unfortunately didn't get much time to do so because her job took up most of her free time, so she lived vicariously through you. She's a fan of photography also, so your blog was a welcome reprieve from a long, hard day at the office. As you may or may not know, bootcamp for Marines is 13 weeks long; the only contact with the outside world is through snail mail. I miss my girlfriend immensely and while I know she's doing something for her country that she's always wanted to do, it's hard on me. I digress, she loves your blog. I know the 4th of July is coming up and I ask you this not only for her, but also for the men and women in the Armed Forces who really know and FEEL the meaning behind this holiday. I think it would be very patriotic and meaningful to bake and decorate something in the spirit of the military, not just flags and sparklers like everyone else is doing - but something to show people that our military needs support and we need to remember them while we're lighting off fireworks at the family BBQ. You know?

Now, I'm asking this because I think it would touch a special place in some of your reader's hearts. I'm willing to bet you have quite a following amongst military wives and/or girlfriends. How nice would it be to show your support? I've served 3 tours in Iraq and am due to go to Afghanistan for a year in the next few months. I won't get to see my girlfriend graduate from bootcamp in September, I won't get to see her looking sharp in her uniform, I won't get to see the pride on her face as finally, at 28 years old, she joins the ranks of The Few, The Proud... so this would be my chance to show her I thought of her. This is your chance to show you think of our military, as many others should be doing. Maybe it'll get people to look for ways to support us with baked goods? During the colder months overseas, my girlfriend would bake cookies and anything else she could that would hold up to the travel and heat, and send on enough for my whole platoon. A taste of home, a taste of love... opening up a box with the smells of back home was something you just can't explain. It was magical. My girlfriend didn't stop there though, she adopted Marines, Soldiers and Airman through Anysoldier.com and sent them care packages and notes of encouragement.

I realize I'm all over the place here, but trying to get my point across is difficult without writing you a novel. I think you get the gist. 4th of July is about more and I'd love to write my girlfriend a letter and say, 'Bakerella appreciates the Armed Forces, when you get back to the real world and have access to a computer... go see her 4th of July post.' Now, I don't know if you'll do this or not and it's fine either way. I just wanted to tell you a little story and hope that maybe a tiny blurb in your blog would entice your readers into caring just a tiny bit more and thinking just a bit deeper on our Independence Day.

I appreciate your time in reading this!

Carlos

What a sweetheart. When I read his letter, I immediately wanted to make and send something to surprise his girlfriend. I thought, how cute would it be for her to open a box of colorful cake pops! Then, Carlos informed me that they can't receive food during boot camp. I pictured her being forced to eat all the pops at one time and then made to run 10 miles or something. I don't think she'd like that too much. Picture it. Cute little cake pops. Marines. Lollipop sticks. Marines. Sprinkles. Marines. Not the best idea for her sake.
Now, I can't send her anything sweet, but I can send her these sweet simple words of appreciation.

Military Pops

It's not much, but I hope that if you do see this when your 13 weeks of boot camp are over, that it puts a smile on your face. And know that you and all members of the armed forces were thought of this July 4th.

Plus… that Carlos… he sounds like a keeper.

Cake Pops

Marine Pops

Cake Pops

What about you? Is there someone on your mind… or in your heart… this holiday?

Hope you all have a happy, safe and sweet Fourth of July!

Friday, July 3, 2009

I Love July!

30 days has a fun patriotic list.


There are so many great 4th of July ideas out there. I decided to highlight the ones I haven't seen as much. Here are my favorites:

4th of July wreath by Pampering Beki

Joy's Hope's 4th of July outfit (LOVE)
Katherine Marie's red, white & blue post


Old fashioned 4th of July crafts from Create My Event


Kids 4th of July crafts from The Crafty Crow
How to photograph fireworks from Digital Photography School


4th of July dessert round up by Hostess with the Mostess


Flag etiquette from The Finer Things

And check out my 4th of July post from last year for more ideas.

Rainbow Cupcakes

This is such a cool idea. I first found it on creative itch
using red white and blue. SO CUTE! Then I went to the link she had to Our Best Bites and saw the rainbow ones. SO FUN!

Here is the photo from Creative Itch:

I'm excited to try this same idea for other holidays too. Think how cool they'd look using Christmas colors....and Valentine colors.....and pastels for Easter! Yummy!!

Info from Our Best Bites:
My Mom is a really creative woman. I didn't realize it until I grew up and became a mother myself. Now that I look back on the birthday parties she threw and the incredible cakes she created, I'm really amazed at the things she came up with back in the day when you couldn't run to Target or Walmart and basically buy a party in a bag. Halloween costumes were no exception. We never, ever had store-bought costumes growing up. My Mom was a great seamstress and her creativity had no boundaries. I look at old family pictures and I love how she took simple ideas and turned them into something fun. Take me for example, around age 5:


That my friends, is a rainbow. And I thought it was the coolest costume ever. [Insert joke here from my husband about how I'm being prepped for my first parade. You know, as in *parade*. Now ignore joke.] I was obsessed with this chick, and if you look at every picture I ever created out of any sort of art media between the ages of 3 and 9, it undoubtedly included 3 things: hearts, flowers, and rainbows. To this day, I [clearly as a heterosexual woman] still get a little bit giddy inside when I see all of those colors together. Something about rainbows just makes me happy.

If you read the CafeMom feature from last week, I noted that my youngest son just turned one. For my first son's birthday I made an adorable cake with matching mini-cake and matching cupcakes with matching favors and decorations for the hordes of people I invited to his first party. In keeping with second-child-syndrome fashion, my second son's first birthday rolled around and all that I had collected was this:


Not much. But see the colors? I told you I love that stuff. The bright combo just made me happy and they looked as bright and happy as my bubbling little boy, so I decided to just use that as a theme. Like, uh..balloons. Ya, it's a colorful rainbow balloon theme. Or at least that's what the scrapbook pages will indicate when he's old enough to wonder why no one was at his party and it had no theme. I really wasn't in the mood to make a big fancy cake (since no one was even coming to this party... ya, I'll erase this comment when he's old enough to read), so I decided to do cupcakes and make it easy. A few months ago, I spotted a great rainbow layer cake on a food blog I love, Omnomicon, and decided that I'd make a fun cupcake version of my own. Using a doctored cake mix made it even easier.

(I would like to make a special note to my friend Britanie that I am in fact using a cake mix. See? I'm not a total snob :)


You'll want gel food colors for this, not the little bottles of liquid. Gel color adds a ton of color with a small amount of dye. You can find gel colors at craft stores like Michaels and Roberts, and in the cake decorating isle of Walmart. If using red, make sure to get the one that says "No Taste"


Colorburst Cupcakes

1 white cake mix
2 eggs
1 C sour cream
1/2 C milk
1/3 C vegetable oil

Combine all ingredients until incorporated (about 30 seconds). Scrape sides of bowl and then beat on med-high speed for 3 minutes.

Divide batter according to how many colors you are using. I used 5 colors and it worked out to a little over 1 cup for each color.

Use food coloring to color batter to desired intensity. I used a 1/4 t and they were very bright! You could easily make pastel rainbows using a little less.


To get a layered stripe like I used, you'll want to put a spoonful of each color in the cupcake one at a time. The batter is thick, so it won't spread on it's own. A great tip is to set out a little bowl of water where you're working. Dip your finger in the water and then gently spread the batter out. The water will make it so the batter doesn't stick to your fingers.

Another tip is to use a measuring spoon and some water to measure out how many teaspoons/tablespoons are going to fit in your cupcake. Then divide that by how many colors you have so you know how much of each color to use for each cupcake. For my 5 colors, it worked out perfectly with 2 t of each color in each cupcake. So I put in 2 t of blue in the bottom of each cupcake and spread it out with my finger. Then I put in 2 t of green on top of that, then yellow, etc.

Bake them according to the package directions, until a toothpick comes out dry. Check these babies out! I swear I didn't photoshop these. True crazy colors. I love how you can see the rainbow through the papers. If you want blue on top, just reverse the order (duh, right?)


I topped mine with this frosting. A double batch made enough to put crazy high tops like this on all 24 cupcakes.


Pop on another cupcake liner for presentation if you want...


And when you open that little cutie up...WOW! Check this coolness out:


What's fun is that the insides are all different just depending on how they bake. Biting into these is the best part!


Check this one out- for the last couple when I was tired of the whole layering thing, I just spooned batter in randomly all over to make it spotty. It baked up with love on top. Ahhh... that's for all you guys. I heart our readers :)


Now your turn to show some love and bake up some of these. If you're a sports fan, these would be really cool with team colors. How about black, green and brown for a boys camo party? Or holiday color combos are endless.... Have fun!

4th of July Ideas

Here is a great list of patriotic ideas from Pioneer Party:

I love the 4th of July! Not only does it remind me that I truly am proud to be an American, it is a great time to be with family, have a picnic or barbeque, watch beautiful fireworks light up the sky, the list could go on and on! I came upon a great list of ideas that might help your party the party to be at this weekend! Thanks to Studio 5 for letting me use this... and if you have ideas or traditions that you love, let us know! Leave a comment and let us know what fun things you have done...

Studio 5 Party, Holiday and Idea Contributor Alisa Bangerter shows how to make it a fun, festive atmosphere.
Invitation Ideas:
• Simple invitations could be printed and attached to small flags. If these need to be mailed, simply roll the flag and mail in mailing tubes.
• A creative invitation would be to fill a balloon with red, white and blue confetti or paper shred and a rolled up invite. Fill the balloon with helium and tie on a ribbon. Attach a small tag that states the recipient must pop the balloon to find the invite. Balloons filled with confetti would also make fun centerpieces the kids could pop at the end of the party or take home as favors.
• Attach a printed invitation to a box of sparklers. Ask the recipient to bring them to the party and at dusk everyone can do fireworks.
• Create a "formal" invitation written in the same language was the Declaration of Independence as an invitation to your barbecue. Print on parchment paper, roll it up and tie it with a ribbon. You could even fold it and use a wax seal on the envelope.
• Attach an invitation to a patriotic photo.
• Be really creative and have someone dress like Uncle Sam, Betsy Ross or the Statue of Liberty and deliver the invitations personally.
• Ask guests to come dressed in red, white and blue.
Table Setting and Décor Ideas:
• Cover tables with white paper and sprinkle red and blue crayons on the table for guests to use. • Tables covered with newspaper and stamped with red and blue stars using acrylic paint can look nice and save on the budget. Newspaper can also be used as sandwich wraps.
• Print the Declaration of Independence on paper and use as placemats or napkin wraps.
• A quick centerpiece would be to fill red or blue sand pails with sand and insert small flags or stars on wire.
• Sprinkle red, white and blue wrapped candy down the center of tables. Another option would be to fill different sized jars and containers with candy and place on tables for easy snacking.
• Hang flags around everywhere or line walkways with them. Place some string or strong fishing line across the area of the barbecue and hang small flags and/or stars from the line. (You could also hang festive paper napkins, fabric triangles, curled ribbons, etc.) This will create a low ceiling effect and add to the atmosphere. Tiny lights and paper lanterns also would add if at dusk.
• Play patriotic music in the background.
• Print coloring pages (patriotic images) for children to color. Place them on the tables. It might be fun to create and print 11x17 (or similar size paper) placemats with patriotic puzzles, trivia, images to color, facts, etc. This is similar to what kids would get in a restaurant.
• Wrap silverware with napkins and a band with a patriotic trivia question or fact on it.
• Have patriotic stickers for kids (and adults!) to decorate their drinking cups with.
• Use inexpensive kitchen towels as napkins. These wash up great and are nice when having messy food such as ribs, sloppy joes, etc.
Creative Food Ideas:
• Place large bowls of popcorn in the center of tables for everyone to snack on while the food is grilling.
• Use flag picks in food such as burgers and sandwiches.
• Serve bottled drinks in an ice filled red wagon. Stick some flags in the ice for a festive touch. An ice filled child size swimming pool is also a great way to serve drinks for a large crowd.
• Wrap bottled drinks and water with customized bottle wraps. If they will be in ice, cover the wrap with clear packing tape.
• Use red apples with blue or white ribbons tied to stems as centerpieces. Place them in baskets, bowls or tiered display pieces to create a fun and tasty edible display.
• Be creative when grilling food. Use circle skewers for kabobs, cut stars out of cheese to melt on burgers, etc.
• Set up an ice cream bar with a variety of red, white and blue toppings and ice creams.
• Serve red, white and blue chips. Terra Chips makes some exotic vegetable chips called: Stripes & Blues. They are made from red sweet potatoes, blue potatoes and candy striped beets. They are found in local grocery stores and are very fun!
• Float a few raspberries, blackberries, strawberries and/or blueberries in a drink jar.
• Set up a cupcake decorating station where everyone can decorate a cupcake or two for desert. Have several icings to choose from and lots of red, white and blue candies and sprinkles for toppings.
• Serve homemade ice cream. You could have a homemade ice cream making contest.
• Ask guests to bring a homemade pie and have a contest. Give a prize to all and then serve the pies for dessert.
• Make star watermelon pops. Simply cut slices of melon and then cut into star shapes using a cookie cutter. Insert a wooden Popsicle stick in the side and freeze.
• Make s'mores over a fire pit using red, white and blue star marshmallows available at grocery stores.
• Serve patriotic floats by scooping vanilla ice cream in red or blue soda. Use three straws in each…red, white and blue!
• Serve red white and blue fruit on skewers. These would also be fun used as drink stirrers.
• A creative way to make a flag using fruit is to alternate strawberries and banana slices on skewers and lay them on a platter side by side to make flag stripes. Thread blueberries on the top of several of the skewers to create the blue portion of the flag when the skewers are set on the platter.
• Take the time to place chips in bowls and buns on platters. Something simple like this can add to the presentation of the food.
• Press the sides of purchased ice cream sandwiches in red, white and blue sprinkles for an easy and quick treat.
• Serve foods in single serving cups such as cut up fruit, salads, etc. This can add a fun dimension to serving the food and even can help control portions.
• Use ice cream cones as serving containers for fruit, salad or candy.
• Use name cards or food picks to identify foods served. Use creative names such as star spangled sloppy joes, patriotic potato salad, liberty lemonade, firecracker chicken, etc.
• Remember to use food coloring in cakes, salads, breads, etc. to create fun red, white and blue looks.
Simple Activity Ideas:
• A fun activity would to give each family (or group of 5-6) a sack with some random items in it. Give the groups 15 minutes to come up with a skit using the items. Have the skits be patriotic in theme and maybe give a specific word or line each must say somewhere in their skits. Have some items in the bags that are red, white and blue or patriotic in nature. These skits are often hilarious and a ton of fun!
• Make cards for someone in the military. It might be nice to have a veteran come and give a little presentation about his/her service for our country.
• Have a karaoke time and make sure to include some patriotic songs.
• Make up a patriotic trivia quiz and give a prize who can answer the most.
• Have readers take turn reading the Declaration of Independence. Have the readers dress the part.
• Hide paper stars or tiny flags all throughout the yard. Have the kids find them and give prizes. • Hold a sidewalk chalk mural contest for the kids. Tell them to draw something patriotic and give prizes.
• Play a game patterned after "Who Wants to be a Millionaire". Create patriotic or American history type questions. This is a lot of fun and can be educational.
• Have a photo station for families or individuals with lots of fun patriotic props.
• A favor packet, bag or basket could be sent home with each family or individual. Place simple items inside such as wrapped patriotic cookies or star shaped rice krispie treats, simple fireworks, handmade patriotic games or puzzles, a copy of the Declaration of Independence, red, white and blue popcorn or other items, etc. Make these simple and inexpensive but a fun surprise for your guests to have. . You could also make grab bags for each child filled with simple activity items, candy etc. and give these at the first of the barbecue.
Thursday, July 2, 2009

All Things Lime

These women at the Secret Stitch Club are so cute! I LOVE the stuff they make. Sign up for a chance to win a free apron.

I love lime. With a sweet passion. Or a tart passion. Whatever way you see it. The color, the flavor, the fruit...I love it all. I've had this idea in the back of my mind for awhile to make Key Lime cupcakes with a Key Lime filling. Key limes were on sale so I picked up 20 for $1 and started searching for some good filled Key lime cupcake recipes. I found quite a few, but none were quite was I was looking for. So I combined and adapted recipes to fit my taste...a Graham cupcake (by Vanilla Garlic )with Key Lime curd filling (by Coconut & Lime) and a lime whipped cream cheese frosting (from allrecipes). I so loved the final product and wanted to share! Oh, don't worry. It's not just a recipe...if you make it to the end there's a giveaway too! Lime themed. :)
Filled Key Lime Cupcakes

Graham Cupcakes by Vanilla Garlic
Makes 20-24 cupcakes / 350 F oven

What You’ll Need...
1/2 cup of butter, room temperature
1 cup of sugar
3 eggs, room temperature
1 cup of milk
1 cup of flour
1 1/2 cups of graham cracker crumbs
1 teaspoon of baking soda
1 teaspoon of baking powder
1/8 teaspoon of salt

What You’ll Do...1) Beat the butter for about 30 seconds until well creamed. Add the sugar and mix for 3 minutes using a paddle attachment until light and fluffy. 2) Add the eggs, one at a time, being sure to beat for 30 seconds for each egg. 3) Place graham crackers in a food processor or in a plastic bag and beat the crud out of them until it's been ground into small crumbs and powder. 4) Sift together the flour, graham cracker crumbs, baking soda and powder, and salt. Add about 1/4 of the mixture to the butter mixture, then add some of the milk. Continue to add the ingredients in a dry-wet-dry method, ending with the dry. Continue to mix until just combined. 5) Scoop into cupcake papers, only fill half-way, and bake for 15-18 minutes in a 350 F oven or until a cake tester comes out clean.

Key Lime Curd adapted from Coconut & Lime
3 eggs
6 TBLS butter
¾ cup sugar
½ cup key lime juice
1 tsp lime zest

Directions:
Over low heat, melt butter in saucepan. Add the remaining ingredients and whisk continuously for 8-10 minutes, or until mixture becomes a custard. Allow to cool. It will thicken as it cools. Pour into a jar or bowl, cover and refrigerate.

Whipped Cream Cheese Frosting (with added Key lime zest) from allrecipes
1 (8 oz package) of cream cheese
1 cup of white sugar
1 teaspoon vanilla extract
1/8 teaspoon salt
1 ½ cups of heavy whipping cream
1 tsp lime zest

In a small bowl beat whipping cream until stiff peaks form; set aside. In a large bowl combine cream cheese, sugar salt and vanilla. Beat until smooth. Fold in whipped cream with cream cheese mixture. Add lime zest.

Putting it all together--

I use a really long tip (Wilton 230) to fill cupcakes. Just jab the tip into the middle of the cupcake and squeeze the curd into it. You know you have enough when the cupcake starts bulging on top. You can also cut a hold in the cupcake, fill it with the lime curd, and replace the cake.
Filled cupcakes.
Top it with the whipped cream cheese frosting and eat!

It seems like a lot of work, but it's really pretty easy. I made the key lime curd and the frosting the night before, so the next day all I had to do was make the cupcakes, fill, and frost. It's so worth it!

Now, in celebration of all things lime-y (is that a word??), we are giving away a Key Lime apron. Trimmed in ric rac, with a sweet bow and a pleated ruffle, this apron is perfect for baking (and eating) some Key Lime cupcakes in! Check it out:

You have three chances to win.
#1. Leave a comment telling us anything your heart desires. (Personally, I'd love to hear what your favorite cupcake flavor is...but whatever you wanna say, we'd love to hear!)
#2. Post on your personal blog about this giveaway and then come back a leave another comment telling us where to find it.
#3. Check out our Etsy site and then leave a comment telling us what you love. There are some new items up now, and more to come in the following weeks!
You will need to leave three separate comments to be entered three times. We will be using the Random Number Generator to determine the winner! You have until next Monday, July 6th at 11:59pm to enter. Good luck!

BONUS GIVEAWAY: Hey... this is Maren. I found this darling apron that I made for Etsy & decided it was too lime-a-licious to miss out on this fun limey giveaway so I decided instead of selling it I will just give it away for FREE (to celebrate me joining Etsy & Christie selling kids aprons). We will have a winner for Christie's green and white scrumptious apron above, and another pint sized winner for my "Cherry Limeade" child's apron. This is for a child size apron 2t-4t.

#4 - To enter for kid's apron, just leave a comment with your favorite summer drink and an email or way to contact you if you win!! Good Luck! Giveaway closes Monday July 6th 11:59 pm.