Thursday, February 19, 2009

Grocery Bag Organizer

Found this on Creatively Domestic:

Grocery Bag Organizer
I finally kicked the fever-induced fog and returned the house to a non-sick-emergency state. My husband has been a huge trooper through all my whining! So now back to blogging!!!

Since January is the kickoff month to getting organized, I thought I'd share my own take on organizing all those grocery bags that come into our homes. I bring my own reusable bags to the store, but once a month, I get groceries with the plastic bags for use in our home for garbage bags. To keep them all in one place and to add a little "color" to my life, I use clean empty disinfectant wipe containers and give them a make-over! Here are the bottles with the labels removed:


Then I wrapped them in scrapbook paper, (I may hate to scrapbook, but I love love love scrapbook paper!) and stuffed in the grocery bags:


The things I love about these:
  1. It gives my all sorts of the "Save the Earth" goosebumps! Reusing the bags and reusing the wipe container - double whammy!
  2. The bags are no longer stuffed into another plastic bag, then stuffed into the cabinet, then the pile always seems to grow until I open the cabinet and out fall 40 gagillion bags. Imagine: timber!
  3. I can take one of these containers, throw it in the car in the morning of one of our roadtrips (or any regular Saturday expedition) and we have lots of empty bags for whatever kid emergency pops up throughout our adventures.

Wednesday, February 18, 2009

Heart Hands

I saw this on Lesson Plans Plus. I want to do them on dish towels.

I want to share a very easy Valentine idea. To make a hand print heart: paint on your child's hand in his/her choice of color(s). Once the hand is painted, instruct them to close their fingers and then press their hand onto a piece of white construction paper at a sideways slant. Paint the other hand in the chosen paint color and press that hand onto the paper slightly overlapping the fingers of the print already on the page. This is a very easy project but rather difficult to explain so I'm going to add pictures of my own children's hand print hearts so that you can actually see the project. I think this will make it much easier for you to do the project at home or school.


Once the hand print hearts are dry, you could add a clever Valentine message and give the card to a parent, a grandparent or special friend as a gift. A couple of Valentine phrases that I have used in the past:

~You're the best Valentine, hand's down!

~I've got to hand it to you, you're the best!

You could also do this project with feet. You could make foot stamped hearts or trace the children's feet and help them glue their foot cut-outs into a heart shape.

Menu Planning Form

Meal Planning from The Project Girl:

Here is a menu planning form that I use when I’m planning out my menu for the week. The top half has a weekly calender with space for Breakfast, Lunch, & Dinner Menus. It also has space at the bottom to list all the ingredients that you need to get at the store. A pretty simple and straightforward menu planner that also looks great on your fridge or magnet board!

meal-planner

Download this file and enjoy (for personal use only). Please tell your friends to come visit the site and download their own file. I would love a comment if you do download!

I also have a slightly different version of the form that does not have the meals for each day broken up.

mealplanner22

Download this file and enjoy (for personal use only). Please tell your friends to come visit the site and download their own file. I would love a comment if you do download!

Each of these files are a 8.5″x11″ PDF. Use Acrobat Reader to open the file and print as many as you like! Happy Menu Planning!!

Car Seat Cover and Hooter Hider

Tiff and Lani these ideas are for you:
My sister made me this car seat cover and a nursing cover like this one on little birdie secrets.

Photo Blocks

Love this idea from Nannygoat:

I love this gift from my sister-in-law. There are 6 pictures total on the same blocks... so fun!Here are some links for different versions of this http://holycraft.blogspot.com/2008/07/introducing-photo-blocks.html and http://www.mormonchic.com/crafty/more-christmas_crafts.asp#blocks


Monday, February 16, 2009

Milk Carton Gift Box

Hot Chocolate milk cartons from Dannie's Designs.

Hot Chocolate Gift Set

I bought the tutorial on how to make this from Becky. I wasn't sure what to make with it at first, but I found it works perfectly as a hot chocolate kit.

Hot Chocolate Milk Cartons

I added a different ingredient in each of the milk cartons--hershey's kisses (to melt in the hot chocolate), marshmallows, cocoa, and peppermint candy canes. I wanted the teachers to be able to see what was inside each milk carton, so I punched a window with the Curly Label punch and then added a piece of acetate to the inside of the carton.

Hot Chocolate Tag

I finished the kit with a tag and some directions. I inked the largest snowflake from the Snow Swirled stamp set in Baja Breeze ink. I stamped it off on some scratch paper and then stamped it on the tag. It's very faint in this photo.

I hope the teachers like their gifts. Becky, thanks for the great project idea! ~Dannie

Stamps: Snow Swirled
Paper: Whisper White, Baja Breeze, Chocolate Chip, Ruby Red, Old Olive, Holiday Treasures DSP
Ink: Baja Breeze, Chocolate Chip, Ruby Red, Old Olive
Accessories: Silver Eyelet, Linen Thread, Baja Breeze 1" Double-stitched Ribbon, Acetate, Sticky Strip, Crop-a-dial
Punches: Small Tag, Large Oval, Small Oval, Tag Corner, Key Tag, Horizontal Slot, Curly Label, Corner Rounder

Word Banners

Valentine Banner From Crafting Chicks:

Made this banner the same way I made my HAPPY BIRTHDAY banner. Just with the words "BE MINE" and a few hearts.


This is the Birthday Banner from Jamie's Digital Designs:

I wanted to make a little birthday banner this month . I was going to sew one, but since that would be too tricky and time consuming, I thought I would digi scrap one. I used the cookie cutter tool in photoshop to cut out the rounded corner squares and circles. I just made one of each and used them as a template to finish the words.
I printed them 5x5 and then mounted them on card stock. I used scalloped scissors to make the cute edge. I strung the letters together and added cute ribbon in between each letter.

I also used the Autumn Medley kit from Shabby Princess for this project.

I am thinking of making a Halloween one now. It was a fun and quick project.

Sunday, February 15, 2009

Candy Bar Boquet

Need a last minute Vday treat for your loved one? Make this candy bar bouquet found at Homemaking Fun.


Here is one I found on It's all in my head:
Candy Bouquet for Ted


Cupcake Take Along

Love this idea from Capture the Moment.

I have one final project that I thought I would leave you with today as we wrap up the January countdown. It is another Thrifty Gifting idea that was inspired by Lauren's newest template to be released this month, the Take Along Tote.

.............................................................................................................

Supplies If you are anything like me, I always enjoy giving thoughtful gifts to people rather than just picking up something from a big box store. Especially when it comes to gifts for children. Really, how many Barbies can a girl have? So I thought I would show you a fun alternative that I designed for a birthday party we are going to next weekend. I call it the Cupcake Take Along. I gathered a few inexpensive items from the store to create my kit.

.............................................................................................................
Wrapped box To begin, I wrapped my cake mix box with red cardstock. This required two sheets cut to measure 5-5/8" wide and 11 inches long. I scored the top and bottom of these two pieces at 1.5", creating top and bottom flaps. I then just adhered the two pieces together lengthwise to create a large wrap.
.............................................................................................................
Scored tube strip Next, I cut out the two main pieces for the body of the tote template using red cardstock. I wanted to create a special area for all of the different sprinkles to be kept. So I cut a 1 x 11" strip of white cardstock and scored it @ 1.25" from either end, followed by 3/4" increments in the remaining center portion. Use my photo here as a visual to create your mountain and valley folds. A little piece of scor-tape at the base of each section will help to make the piece secure.
.............................................................................................................
Attached tube strip When you peel away the tape backing and adhere the strip to the interior of your tote, you are left with something that looks like this.
.............................................................................................................
Attached tote Now that the tube strip is adhered to the inside, the tote can be adhered to the front of the cake mix wrap with scor-tape.
.............................................................................................................
Tape for handle I wanted ribbon handles to go all the way around both the cake mix box and cardstock tote that I adhered together, so I laid the entire piece on its side and ran two pieces of scor-tape down, around the bottom and back up the other side.
.............................................................................................................
Ribbon handle I then started applying my ribbon at the bottom and went up a side over the top creating the handle, and back down the other side. I repeated these steps on the opposite end.
.............................................................................................................
Tubes Now that the handles are done, all that's left for the inside of this cute little cupcake tote is a few of our Trendy Tubes filled with the various sprinkles that I picked up at the store. The easy tube strip I created from white cardstock holds the tubes in place securely.
.............................................................................................................
Cupcake Take Along For the outside, I printed the Take Along Tote Pocket template onto Raspberry Fizz cardstock and assembled it. I adhered it to the front of my tote.
.............................................................................................................
Hey cupcake I created the catchy "Hey, cupcake" sentiment with Fresh Alphabet & Simple Alphabet. The felt flower is from American Crafts and the epoxy brad is from Making Memories.
.............................................................................................................
Cupcake tag closeup Notice the little birthday tag made with Heather's new Around & about Sentiments. It is clipped in place with a bright pink mini clothespin that I have been hoarding for quite some time now. I love it when things like that work out!
.............................................................................................................
Candy heart bag This tote pocket holds a glassine bag which I filled with the decorative heart candies. The top of the bag is folded over and tied shut with raspberry fizz satin ribbon.
.............................................................................................................
Cupcake tote sideHere is a side view of the tote. Notice how the tubes are a perfect fit for the width of the Take Along Tote template.
.............................................................................................................
Magnetic closure And as one last final detail, I used a Basic Grey magnetic closure along with a patterned paper flap to help keep the tote closed.


Another take on this idea from Inking Idaho

I ordered the bags and the test tubes from Nichole's store and they were here in like 3 days!!! She is super fast!

Tuesday, February 10, 2009

Memory Quilt

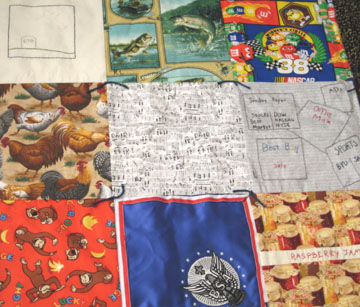
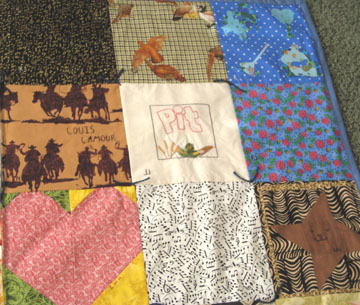
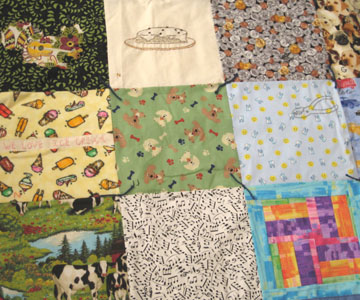
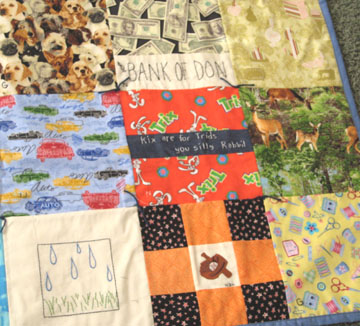
This Memory quilt from Make and Take would be very fun. I even have some old blankets that my mom made us when we were little that are thread bare but I hate to just get rid of them b/c they have memories. But this would be one way to salvage them.

The 10×10 squares were quilted, stitched, ironed on, and fun printed fabric. Each square represents a memory, something about us, or something fun about my mom and dad. Here are just a few of them explained:

  • We used to own chickens
  • We love to play PIT
  • My mom makes the best chocolate chip pancakes
  • My mom plays piano and sang in the Mormon Tabernacle Choir
  • My dad loves to read Louis L’amour books
  • My dad has taken us all out fishing on his trolling boat
  • “Good Kid Money” my dad would give us
  • M&M’s my dad loves to give to the grandkids
  • A large squirrel caught in the house by Jared
  • Ice Cream is a big part of the Holt house, especially homemade
  • My dad used to pull our loose teeth out with pliers! Talk to my sister Steph about that one!

memory-quilt-p1-032.jpg

memory-quilt-p4-033.jpg

memory-quilt-p3030.jpg

memory-quilt-p2-031.jpg

Photo Bookmark

This is something my husband needs. Thanks Make and Take for the Valentines day Gift idea!

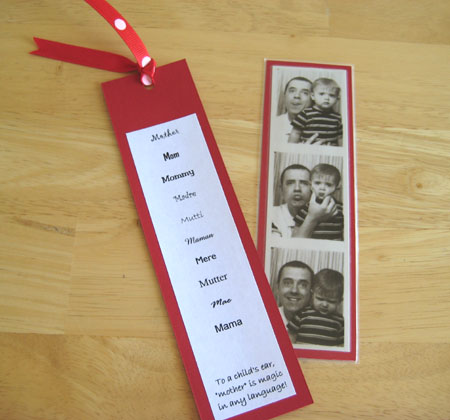
For Mother’s Day a few years back, my sweet hubby made me the bookmark on the right (I know, very creative!). It has been my favorite gift, I love looking at the photos of my cuties. The next year, we made these bookmarks for Grandmas and they loved them even more. One Grandma keeps it in her purse instead of her books.

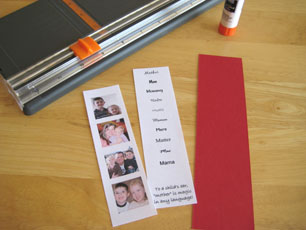
To make these photo bookmarks, find a Photo booth that makes the line of black and white photos, some are in color now. I have always found these booths at Kmart or sometimes at the mall. The example below was made with my computer out of photos I have and I cropped them to fit the size of a bookmark. Once you have the photos printed, then cut a piece of cardstock paper a little larger than the photo line. Glue the photo line onto the paper.

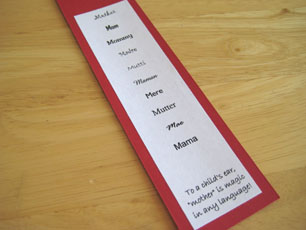
You can also decorate on the back of the bookmark. Another photo line can be added or a fun saying. You could put meaningful sentiments from you as well. I typed up lots of ways to say the word “Mother” in different languages. Then add a few stickers or ribbon to embellish.

Now you will need to seal this so it will last forever. You can go to a copy store and have it laminated. Or you can buy contact paper to laminate it yourself.

Busy Bags

Great Idea by Make and Take:

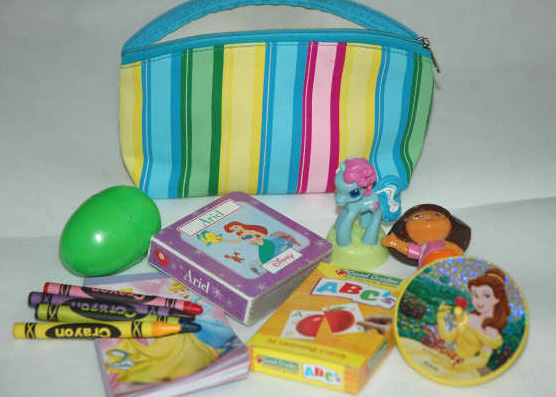
Here’s another Guest Make and Taker with a great idea. Tamela and her kids are sharing their Busy Bags. With these Busy Bags ready to go, hopefully you won’t be hearing the words, “I’m bored”, coming out of their mouths.

Busy Bags are a great travel companion. They’re perfect to pull out when your kids have to wait at a restaurant, a doctor’s office, or in the car! They’re life savors and pretty inexpensive to make. Head to your local Dollar Tree or party section at Wal-Mart and pick out things your child would like.

Kids Busy Bags

We put a small book, a few crayons and note pad, a top, 2 small toys, a card matching game, and silly putty in our bags. Other things you could add is a mini bottle of bubbles, a small car, or anything else that would fit in your bag!

Thanks Tamela, for the great idea. I have most of these things, now I just need to put them all together in a fun zip-up bag. A child size fanny pack would work great too. I also think silly putty is a fun one to have in the bag. It’s fairly mess free and fun for kids to manipulate, keeping them “busy”.

Letter of the day

I love this idea from Make and Takes: I am starting tomorrow!

Vannesa from I Never Grew Up is today’s Guest Make and Taker. She’s starting to post some great ideas on her blog for learning the Alphabet letters. These activities are sure to spark interest in the ABC’s, getting your child ready for school and ready to read.

We just started a new activity at my house, “Letter of the Day”. My ideas are geared towards my 2 ½ year old, but most of these activities can be used for any age of child working on the alphabet. I try to incorporate reading, music, art, gratitude, exercise, nature, touch, and a family activity into teaching each assigned letter. We actually spend two days on one letter, making enough time for all the fun activities and all the regular things going on in our day to day life. This may seem like a long list of things to do, but each of them only takes a small amount of time and hardly any planning ahead. For more detailed ideas on each letter, visit my blog to follow us along as we work on them.
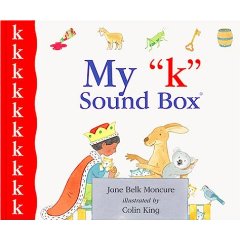
Reading - We start off every letter by reading, My “A/B/C/etc.” Sound Box Books by Jane Belk Moncure & Colin King. These are the ones we like but after looking at the library there are quite a few alphabet book sets you can check out. We also read at bedtime to go along with the letter. On days where it is hard to find books for certain letters, we read our favorite alphabet books: Chicka Chicka Boom Boom by Bill Martin Jr., John Archambault, and Lois Ehlert, Kipper’s A to Z by Mick Inkpen and ABC: A Child’s First Alphabet Book by Alison Jay.

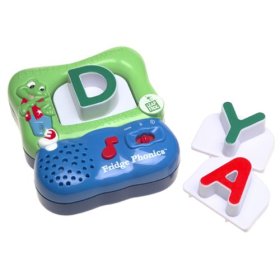
Music - To help teach the sound of the letter we use our Leap Frog Fridge Phonic Magnetic Set.
We also play at different times of the day the CD track of the letter we are working on from “Sing Alphabet Sesame Street”. There are so many music CD’s that help teach the alphabet, my daughter likes Sesame Street so we went for this one.

Art - We do two art projects to go along with each letter. The first one we create the actual letter from all sorts of supplies (feathers, pipe cleaners, sand, paint). Then we go through old magazines and look in our craft bins for little trinkets to glue on to make an art collage around the letter. While we go through magazines we also cut out the certain letter we are using in different fonts on different pages so she can become accustomed to the different styles the letters can be seen in.
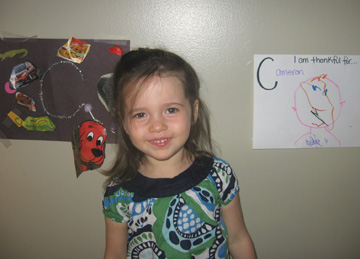
Gratitude - The other art project we do goes along with our Gratitude Alphabet we are trying to complete that we are displaying downstairs in our play room. For each letter we draw/create/cut out the things we are thankful for that start with the letter. It’s been anything from a person, to a favorite food to our favorite object outdoors.

Exercise - Later on in the day we play a certain game or do a certain exercise that goes along with the letter. We only spend a few minutes, but it helps participate in an activity the letter starts with. For the letter C we played a simple game of Catch. You may have to be pretty creative with certain letters, making up your own game or exercise beginning with the letter!

Nature - While we are taking our daily nature walk with our dogs, we take time to point out all the things we see beginning with the letter of the day. We haven’t got to Q, Z, X so it has been easy so far. You might try listening to a sound outside that makes the letter sound, if you can’t visually find something that starts with the letter.
Touch - My mother did this with my siblings and I to help us learn to feel the shape of the letters. She had us trace the letter in different touches: dried beans, sand, water, finger paints. She always started teaching us the letters at a pretty young age so before she knew we could actually write the letters she would have us just get used to the feel and shape of each letter.

Family Activity - I end teaching the letter with a family activity that goes along with it. In my family, we love to cook and eat, so usually it has to do with food. For D we made homemade donuts and for Z we made some yummy zucchini fritters.

Celebration - After we complete a few letters we take a day off to have a nature scavenger hunt or treasure hunt including clues having to do with the letters we’ve learned. The clues can be as simple as recognizing the letter or as hard as having them write the letter 20 times before advancing on to the next clue.

Have Fun! Thanks for letting me do a guest post Marie, we love your site and have gotten many great and fun ideas from it! You can get more ideas and reviews to help parents entertain, care for and educate your children from my daily posts at my blog I Never Grew Up along with fun giveaways to win posted every other week

Thanks, Vanessa. What fabulous ideas to incorporate in learning the ABC’s. I love that kids are learning letters through all kinds of mediums. Nature walks are a great way to get active and learn at the same time. Thanks for sharing your great ideas on Letters of the Week.